Showing posts with label DIY. Show all posts

Tuesday, March 20, 2018

Naturally Whiten Teeth With This Homemade Toothpowder

Naturally Whiten Teeth With This Homemade Toothpowder | activated-charcoal-powder | General Health Special Interests


For far too many years, there have been stories exposing harmful chemicals found in our everyday items. Chemicals such as fluoride and triclosan found in deodorant, cosmetics, and our toothpastes, has led me to find more natural products to replace them. If you think the FDA is on our side and looking out for these harmful chemicals, think again. In fact, the FDA actually conspired with Colgate to hide the evidence of how harmful triclosan truly is.


As usual, we need to be more mindful about the products we use and try and find more natural ways to live. Making your own tooth powder is a natural way of cleaning teeth and a way of rectifying the issue of removing the chemicals from our daily lives.


In fact, I came across how useful charcoal is as a natural way to clean pots and pan when you do not have soap, so why not use it on your teeth?


Making natural tooth cleaning agents is not difficult. Really, most of the items are in or around your home. When I began researching about making homemade tooth cleaning powders, I came across stories of ancient Egyptians, Native Americans and even Hippocrates, the Father of Medicine using charcoal or wood ash as a way to clean teeth. Many view this as an archaic form of toothpaste, but it is still used today. In fact, our dear friend, Granny Spear wrote of her childhood experiences of gathering soot from her wood burning fireplace.


Toothpaste was available in some of the bigger shops, and it was in the form of powder usually. It had all kinds of stuff in it, but was far too expensive for large families.


We used soot. Every few weeks the range would be allowed to cool down so it could be given a good clear out. It burned better if all the sooty deposits and most of the ash was removed. I’m sure you know that wood burns better on an ash bed, and because of that we would always leave about an inch in the bottom of the fire box.


Collecting the soot was easy – just reach in and scrape it off. I collected it on a tin pie plate and then when I had enough, would spoon it into small tins that used to have mints in them.


For the younger children, I made it into a paste and put it on their brush for them… the brushes were all one size, far too big for children really. The older children would just dip the damp bristles into the soot and that was that.


Their reward was a couple of mint leaves or a chunk of apple to take the sooty taste away.


Activated Charcoal – Why It Works to Whiten Your Teeth


Many of the foods we eat and drink have tannins in them and activated charcoal removes these tannins through a process of adsorption, which is a fancy way of describing how the porous surface of activated charcoal attracts (mostly unwanted) material (similar to a magnet) and holds it in its pores. This leaves the area around it clean and does not affect the enamel or calcium in your teeth. This is what your water filtration device does to clean water.


Note: You must use activated charcoal. This type of charcoal has been purified and is best for this type of use. As a side note, brushing your teeth with activated charcoal can be a little messy. To prevent this, brush your teeth while showering to cut down on messes. 


Benefits of Activated Charcoal


  • Naturally whitens teeth and removes plaque – Charcoal will naturally remove stains, thoroughly clean and whiten teeth. As well, it’s great for healing mouth sores and for keeping the gums healthy.

  • Rids your body of toxins – When activated charcoal is ingested, it prevents the stomach from absorbing toxins from many over the counter medicines, opium, cocaine and morphine. Activated charcoal is most effective if it’s administered within the first hour of ingestion of the toxin. As well, some take activated charcoal as a toxin cleanse to rid the body of harmful toxins.

  • Relieves bug bites and stings – Making a poultice of activated charcoal mixed with a small amount of water and cornstarch can help reduce the unpleasantness of bee stings, poison ivy rashes, snake bites, spider bites (including highly poisoning bites from the Brown Recluse or Black Widow), and other poisoning bites.

  • Great for keeping the skin healthy – Charcoal is great for thoroughly cleaning the skin. As well, you can use it as a gentle exfoliator and over time, it improves the texture of skin. I love using this activated charcoal sponge in this manner.


How to Use It


Using activated charcoal is super easy. All I do is wet my toothbrush and dip the brush into the charcoal powder and brush my teeth as normal. Adding a few drops of essential oils to your charcoal powder like peppermint oil, clove oil, cinnamon oil and 4 thieves oil will only add to to beneficial properties of and help freshen breath, kill bacteria, and prevent cavities. Here are some other natural alternatives to toothpaste you can use. As well, you can also make a mouth rinse. Here’s how to do it:


Charcoal Mouth Rinse


  • Mix together 1/2 teaspoon activated charcoal powder with about 1/2-1 tablespoon of water.

  • Add a few drops of your favorite medicinal essential oil (listed above)

  • Swish it around in your mouth for 15-30 seconds and then hold the mixture at the front of your teeth for 3 minutes.

  • Rinse very well.


If you don’t have time to make your own activated charcoal toothpowder, purchase charcoal capsules and empty the capsules for the powder or purchase food-grade charcoal powder. If you don’t have time to get the ingredients and make your own, consider some toothpowders that are premade. Here are five of my favorites.


  1. My Magic Mud Whitening Tooth Powders

  2. Natural Tooth and Gum Powder

  3. Smart Ash


Brushing your teeth with activated charcoal may sound strange, but it’s a wonderful natural alternative to harmful and sometimes toxic toothpastes we use today. Moreover, it has many beneficial uses and is a low cost natural solution. I have been using activated charcoal tooth powder once a week as part of my teeth care regimen for the past year and have really enjoyed the results. For the remainder of the week, I use natural toothpastes and I couldn’t be happier with the results. How many of you use activated charcoal on your teeth and gums?


The post Naturally Whiten Teeth With This Homemade Toothpowder appeared first on The Sleuth Journal.

Wednesday, February 7, 2018

How To Make Apple Cider Vinegar At Home – 9 Easy Steps

How To Make Apple Cider Vinegar At Home – 9 Easy Steps | apple-cider-vinegar | General Health Organics Special Interests


Apple cider vinegar (ACV) has SO many healthful purposes, its head spinning. You can use this super food liquid to treat the common cold, get rid of yeast infections, condition your hair, ease digestive woes, reduce swelling, lower blood sugar, get rid of lactic acid build up, increase energy, and even get rid of warts, among other things. What’s more, while you can purchase organic Apple cider vinegar from health food stores that contain ‘the mother,’ you can also make apple cider vinegar quite easily yourself. Learn how to make apple cider vinegar below.


Apple cider vinegar (and almost all vinegars) is usually made with a broad two-step process, very similar to how alcohol is made.


To make ACV, just start with organic apples of any variety. You’ll want to place these in sealable jars or bowls that have tight-fitting lids. The apples will be crushed or diced and exposed to yeast, which helps the sugars that naturally occur in the apples to turn into alcohol.


You can even add the peels and cores. If you stopped at this step, you would have, simply, apple cider. You could add cinnamon and nutmeg and other flavors and have a delicious holiday cocktail, however, ACV requires another step. In France, the word vinegar means ‘sour wine.’


Next, healthy bacteria are added to the alcohol solution, which then further ferments the liquid and turns it into acetic acid – one of the active compounds in ACV that makes it so healthful and healing. While the ACV is ‘cooking,’ though it doesn’t ever meet heat, you will simply cover your jars or bowls with cheesecloth so no debris or pests get into the mixture. Add three parts water to every part ‘apples,’ as well as a few tablespoons of honey and ½ teaspoon of active dry yeast.


ACV brews best when you place the jars or bowls in a warm, dark place to allow the fermentation process to occur.


In order to make ACV that mimics organic, unfiltered Bragg’s or other brands of apple cider vinegar on the market, there will also be strands of proteins and enzymes along with the friendly bacteria that are called ‘the mother.’ It looks like little spider webs floating in the mixture, and will make your vinegar look a little murky. If you don’t like the murkiness, you can simply strain it through a coffee filter.


Once you’ve tasted your ACV after several weeks and it seems strong enough, you can remove the apple cores, skins, and other fragments. Cover your end product in air-tight jars and put in your refrigerator, or store on a shelf in a cool place, and enjoy daily for ACV’s numerous benefits.


To make your ACV really powerful, you’ll want to ferment it twice (not once like alcohol). Though this adds another step, it is worth it to get the most out of your apples.


Materials and Ingredients:


  • A large bowl or a jar with a wide mouth/opening

  • Apple scraps (the cores and peels from organic apples are perfect)

  • A piece of cheesecloth that you will use to cover up the jar so no debris or flies can get inside

  • 3 parts water

  • 1 part sweetener (sugar, honey, etc)


How to Make Apple Cider Vinegar – 9 Steps


1. Cut organic apples into quarters and allow them to rest for a few minutes

2. Place the apples in a wide-mouthed jar

3. Pour water in the jar so that the apples are covered

4. Add one cake of yeast per quart of cider (optional)

5. Cover the jar with cheesecloth

6. Put the jars in a warm, dark place for 6 months, stirring once per week.

7. Filter the liquid into another jar

8. Cover the new jar with cheesecloth for 4-6 weeks

9. Drink! Or transfer into tightly sealed containers


If you need more help or information, check out the below links to read other posts on how to make apple cider vinegar from your home.


Additional Sources:


EarthClinic


YouTube


WikiHow


The post How To Make Apple Cider Vinegar At Home – 9 Easy Steps appeared first on The Sleuth Journal.

Monday, October 2, 2017

10 Natural, DIY Ways To Rid Your Home Of Flies (And Other Annoying Pests)

10 Natural, DIY Ways To Rid Your Home Of Flies (And Another Annoying Pests)

Image source: Pixabay.com


Before we get started with the list of natural fly remedies, it’s important to note that you must identify the exact species of fly you’re dealing with before you can get rid of it. You have to know your enemy, right?


The house fly is the most common type of fly. It’s attracted to animal waste, garbage and any kind of decaying matter. You’ll likely see these throughout the year, but most commonly in the warm summer months. Fruit flies, like house flies, are also attracted to garbage, but more commonly like to linger near partially decayed, sweet-smelling fruit (hence the name).


Another common type of fly—that may be rearing its ugly head around this time of the year—is the cluster fly. Cluster flies are lethargic, slow-moving flies that are attracted to warm, sunny places. You’ll likely see them if you have a large, productive garden, as they are parasitic to earthworms. Cluster flies, unlike house flies, do not carry or transmit disease, but are a nuisance to have around.


Other possible—but less common—types of flies include blow flies, flesh flies, drain flies and stable flies. You likely have no need to worry about these species invading your domesticity.


1. Homemade fly strips


Fly strips (or fly tapes) are a great way to get rid of flies, but come with many ugly side effects. The unsightly and messy yellow “goop” that attracts and eventually kills unwanted flies contains chemicals and leaves a disgusting, slimy residue around your house.


Discover More Than 1,000 Off-Grid-Living Tricks!


A more natural—and less gross—solution is to create your own fly paper. It is much more attractive and uses non-toxic materials that can be found around the house. To create, cut a brown paper bag into 2-3-inch-wide strips. Dip the strips into a mixture of sugar, honey and water. Then, hang the strips using twine wherever flies like to congregate. If they happen to dry out before they’ve annihilated your fly population, simply spritz them with water.


Less mess, less stress.


2. Apple cider vinegar traps


Apple cider vinegar traps are another way of ridding yourself of unwanted flies. Flies can often be found even in the most spotless of kitchens. Simply place an open bowl of apple cider vinegar, water and dish soap near a trashcan or sink. Within a day or two you will find the bowl swimming with the dead buggers, without endangering food safety or the health of your curious pets.


3. Plants


Besides the obvious Venus fly traps, there are numerous plants that can be grown to naturally lower your fly population. Herbs such as basil, bay laurel, rosemary, lavender, mint and even citronella help to repel flies. Because they have strong scents, flies generally stay away from these multipurpose plants.


Most fly-repelling plants can be grown outside or potted indoors, and several are even perennial. This low-maintenance option will help you season your tomato sauce and maintain a pest-free homestead.


4. Essential oils


If fresh or live herbs don’t work as well as you’d like in your fly-combatting efforts, you can also extract the oils from these plants. Harvest them in the morning after the dew has dried but before the sun has burned off any oils. Place the oils in diffusers or open jars around the house.


Other helpful essential oils include tea tree, eucalyptus and cedar.


5. Plastic water bags


This is probably the easiest and one of the most effective fly remedies. A bag of water serves as a lens and reflects movement. Flies are naturally skittish, and will fly away from the bag out of fear.


Fill a plastic bag with water, and hang wherever you tend to find flies (such as near outdoor trash cans). It should repel the flies before they get a chance to invade your domesticity.


6. Place cloves in citrus


While we tend to like the smell and flavor of cloves, flies absolutely abhor them. Cloves are the most effective against houseflies. As a result, flies will stay away from areas where they are present.


They also hate the fresh smell of citrus, so what you will need to do is take an orange or lemon and cut it in half. Poke about a dozen individual cloves into each half of the citrus. Place the slices on a countertop or other open surface. You will find that your fly population drops dramatically.


7. DIY fly killer spray


If you’re like most people, you hate using chemical-ridden sprays around the house—especially in places where you eat. An easy fly killer alternative is to combine dish soap, Windex, vinegar, and water in a large spray bottle.


This method requires vigilance, as you’ll need to spray the flies as they appear, but after several applications you should find that the amount of flies decreases.


8. Red sine traps


Flies love the sweet smell of red wine. If you place red wine in a bowl with some dish soap or vinegar, they’ll be drawn to the scent of the wine and drown in the liquid.


9. Lure them out with light


Most bugs—including flies—are attracted to light. Darken the room in which you tend to find them by lowering blinds.


You can also place light traps in an attic or other enclosed space that humans typically don’t frequent. Light traps will keep flies out without the application of stinky, toxic chemicals.


10. Get physical


It seems obvious, but if you don’t want flies in your house, don’t invite them in! Take out the trash on a regular basis, and keep trash bins far away from your house. Keep your kitchen tidy and make sure there aren’t any stray crumbs hiding in nooks and crannies. Cover pet food dishes and don’t leave food out on the counter.


Make sure your house is well sealed—cluster flies like to invade in the fall months when they are looking for a place to spend the cold winter months. These pests can find their way into the house through the smallest of spaces, so make sure any air gaps are sealed and holes in window screens are repaired before these buggers become a problem.


What tips would you add? Share your advice in the section below:

Thursday, August 17, 2017

How To Make Cottage Cheese And Sour Cream From Raw Milk

How To Make Cottage Cheese And Sour Cream From Raw Milk | glass-bowl-sour-cream | General Health Organics Special Interests


Do you have a source of delicious, creamy raw milk? Or, as our grandparents used to call it, milk?


If you do, you probably cringe when you have to go to the store and purchase dairy products from pasteurized milk. Well, cringe no more, because it is unbelievably easy to make your own homemade dairy products, like cottage cheese and sour cream.


And by “unbelievably easy” I mean that you pour milk into a bowl, cover it with a towel, and leave it on the counter for 2 or 3 days.


I couldn’t make this stuff up – it’s that easy. Well, there are a couple of finishing steps to perfect your product, but that’s how you make these things.


If you tried this with store-bought milk, you’d have a disgusting, smelly mess on your hands that you couldn’t choke down without gagging. This highlights the real difference between raw milk and pasteurized. Raw milk is alive, teeming with healthy gut bacteria, while pasteurized milk is dead, and will rot and degrade if not refrigerated. And yet, somehow, farm fresh milk is contraband equivalent to heroin or cocaine in some states.


The sour cream you get from this process is what really got me thinking about raw milk products. Have you ever wondered why there are so many chemicals in the sour cream you get from the store? That’s because it’s not real. Real sour cream is just that, cream that has soured. Because store-bought products must be pasteurized, it is impossible to make real sour cream. You’d just have rotten cream.


Let that sink in for a minute. Very few people in America have actually had sour cream!  They only think they have, but it’s an artificial concoction.


Once you indulge in the richness of the homemade raw milk product, you’ll never want to eat the stuff in the plastic tub again. And when you see how easy it is, you’re going to say, “You’ve got to be kidding!”  Nope. It’s this easy.


If you’re into preparedness, it’s important to note that this is a great, off-grid way to extend the longevity of any raw milk you happen to have in your fridge in the event of a power outage.


IMPORTANT: If you are making cottage cheese from store bought, pasteurized milk, follow the instructions here. If you try to follow this process it won’t work. At all.


Supplies for making raw milk products


Okay, let’s get started. Here’s what you need.


1.) A bowl


2.) A Flour Sack Towel (You’ll use this again later.)


3.) Raw milk


Make sure your bowl is very clean. You don’t want to grow anything funky in there.


You can use raw milk that has begun to taste a bit off for this. I always use whatever I have left when it’s herd share day. There’s no set amount required. If you use a quart of raw milk, you will get about half a cup to a cup of cottage cheese. The amount of sour cream depends upon the amount of cream in your milk. If you’ve been pouring right off the top and not shaking up your raw milk, you won’t get a lot of sour cream. However, if you put some cream aside right away, you’ll get lots of rich goodness from this process.


I like to use flour sack towels for most things in the kitchen because they’re lint-free and versatile. They can be used for anything from hanging cheese to pectin-free jam making to, of course, drying stuff. These are the ones I buy. I always wash them a couple of times before I use them for food making.


Allow the milk to sour on the counter.


I feel like I should be making this seem more complicated than, pour the milk into the bowl and cover it up. But that’s literally ALL YOU DO in this step. I keep my bowl in the laundry room because it’s a few degrees warmer than the kitchen.


Skim the sour cream that rises to the top.


Leave it overnight. On the morning of the second day, taste the creamy goodness on the top, If it is not quite tart enough, leave it to sour for a few more hours. If it’s just how you like it, skim that sour cream off the top and put it in the fridge. Depending on the texture you prefer, you may wish to drain the sour cream using a flour sack towel to thicken it up. (Then make some potatoes so you can eat it all.)


Let the milk separate.


You want to leave it for 2-3 days until it separates completely into something that resembles the contents of the bowl in the photo above. Yuck, right? That, my friends, is a bowl of curds and whey. (I can’t even tell you how much I want to make a Little Miss Muffet joke right now.) I really like to put pretty pictures on my website, but you need to see this so you know that it’s actually supposed to look like that. When it does, you’re ready to move on to the next step.


Drain the whey from the curds.


Use your flour sack towel to line a colander. Place the colander over a bowl  to catch the whey (see below for “wheys” to use it – haha.)


Leave it on the counter to drain for a couple of hours, or until it is the consistency you desire.  Pour the whey you’ve collected into jar and put it in the fridge.


Rinse the curds.


Gather it up in the flour sack towel and put it under the running tap to rinse the whey off of the curds. If you don’t do this, it could have  bitter flavor that some people find unpleasant.  Squeeze the water out. Return it to the colander and let it drain for another hour.


And you have homemade cottage cheese!


 Isn’t that gorgeous?  It won’t have the hard uniform curds of grocery store cottage cheese.  It will be light and fluffy in texture.


What you can do with whey:


  • Substitute for water or milk in baking

  • Use in place of part or all of the water when cooking rice or pasta

  • Use it for smoothies

  • Use it in oatmeal or other porridge

  • Feed it to livestock for some yummy probiotics – dogs and chickens love it

  • Make ricotta cheese

  • Use it for lacto-fermentation

Some recommended reading:


The Home Creamery: Make Your Own Fresh Dairy Products; Easy Recipes for Butter, Yogurt, Sour Cream, Creme Fraiche, Cream Cheese, Ricotta, and More!How To Make Cottage Cheese And Sour Cream From Raw Milk | ir?t=rm722-20&l=as2&o=1&a=1603420312 | General Health Organics Special Interests (You have to have this book. If you have access to fresh milk, this will be life-changing!)


Wild Fermentation: The Flavor, Nutrition, and Craft of Live-Culture FoodsHow To Make Cottage Cheese And Sour Cream From Raw Milk | ir?t=rm722-20&l=as2&o=1&a=1931498237 | General Health Organics Special Interests


The Raw Milk Revolution: Behind America’s Emerging Battle over Food RightsHow To Make Cottage Cheese And Sour Cream From Raw Milk | ir?t=rm722-20&l=as2&o=1&a=1603582193 | General Health Organics Special Interests

Saturday, May 20, 2017

DIY: 10 Herbal Tea Blends You Can Grow In Your Garden

DIY: 10 Herbal Tea Blends You Can Grow In Your Garden | chamomile | Agriculture & Farming Natural Medicine Organic Market Classifieds Organics


From a sustainability standpoint, herbs are one of the easiest plants to produce. Many of the herbs we grow are perennials and will produce for many years. Drying herbs is a great way to save money and use for cooking or to enjoy for aromatherapy needs. That said, we haven’t completely put these perennials to their full potential.


Harvesting Your Tea


Growing your own herbal tea blends is almost effortless. Many herbs prefer to be on the “dry” side during the growing season, so you can skip a few waterings and they will be ok. In fact, many herbs can be grown in containers on a sunny window sill or patio. Most herbs will fit into a 1 gallon sized growing pot, but make sure your container has a nice-sized hole so that surplus water can drain away. Herbs do not prefer to have their roots sitting in water or saturated soil. A larger volume of potting mix dries out more slowly, so use the largest pot you can. It’s better to combine two or more plants in a large pot than to use several little pots.  Further, fertilize your herbs once a month to ensure your herbs have adequate nutrients.


Prune your herbs regularly to harvest the tender leaves. This will also keep plants bushy and discourage them from blooming; often, blooming will change the flavor of the leaves. Harvest the oldest stems individually with scissors rather than pruning the whole plant to keep a steady stream of leaves coming.


As well, if you are using fruit trees, when you are pruning them, save the leaves and cut leaves or blossoms to make teas with. Harvest the leaves, blossoms, or the root in some cases such as ginger, dandelion and echinacea, and thoroughly dry outdoors for 10 days, or use your food dehydrator at a setting of 95 degrees Farenheit until completely dry.


Some of the easiest herbs I have grown are:


  • Mint

  • Lemon Balm

  • Sage

  • Thyme

  • Dandelion

  • Calendula

  • Lavender

  • Stevia

And, the easy fruit bearing plants I grow are:


  • Rose hips

  • Lemons

  • Blackberry

  • Strawberry

Harvesting Tips:


  • Most herbs are at their peak just before they bloom.

  • Harvest all your herbs at the end of the season, once a frost is forecast. You can dry the herbs whole and store for winter teas or for use as seasonings.

  • Harvest early in the day, after the dew has dried, but while the herbs are still lush in the cool of the morning.

  • Be careful not to tear or crush the herbs until you are ready to use them. You don’t want to waste any of the essential oils.

Tea blends can make great gifts for friends and family! You can easily make homemade tea bags out of coffee filters. For an easy tutorial, follow these instructions. My family usually enjoys a cup of tea with raw honey and some fresh lemon, but that is not always the case. Here are some of my favorite tea blends.


10 Delicious Herbal Tea Blends


Tension Soother


  • 4 teaspoons lavender

  • 3 teaspoons chamomile

  • 2 teaspoons lemon balm

  • 2 teaspoons rose petals

Tummy Tamer


  • 1 teaspoon Calendula

  • 1 teaspoon chamomile blossoms

  • 1 teaspoon fennel seed

Sleepy Blend


  • 1 teaspoon chamomile

  • 1 teaspoon lemon balm leaves

  • 1 teaspoon catnip

  • 1 teaspoon lavender flowers

Immune Booster


  • 4 tablespoons rose hips

  • 1 tablespoon cinnamon chips

  • 1 teaspoon hibiscus flowers

  • 1 teaspoon fennel seed

  • ½ teaspoon lemon peel

Cold/Flu Tea


  • 2 cinnamon sticks

  • 4 teaspoons thyme

  • 1 teaspoon sage leaves

  • 1/4 cup dried echinacea leaves

  • ¼ cup dried peppermint leaves

  • ¼ cup dried lemon balm leaves

  • 3 tablespoons dried elderberries or ¼ cup dried elder flowers

Autumn Blend


  • 3 teaspoons nettle leaf

  • 2 teaspoons spearmint leaf

  • 2 teaspoons lemon balm

  • 1 teaspoon mullein leaf

  • two teaspoons dandelion leaf and root, combined

  • 1 teaspoon rose hips

  • 1 teaspoon ginger root (dried cut and sifted)

  • 4 cups of water

Winter Blend


  • Juice of two oranges (approx 1 cup)

  • 3 teaspoons dried pomegranate seeds

  • 1 4″ cinnamon stick

  • 1 teaspoon whole cloves

  • 4 black tea bags

  • 2 tablespoons honey

  • 4 cups water

Pregnancy Blend


*check with your healthcare provider to make sure this blend is right for you.


  • 3 teaspoons dried red raspberry leaves

  • 2 teaspoons dried rose hips

  • 1 teaspoon dried nettle

  • ½ teaspoon cinnamon chips

  • ½ teaspoon dried fennel seed

  • ¼ teaspoon dried spearmint leaves

PMS Tea Blend


  • 2 teaspoons chamomile

  • 2 teaspoons nettle

  • 2 teaspoons red raspberry leaf

  • 1 teaspoon lemon balm

Chai Spice Mix


  • 3 tablespoons cardamom

  • 3 tablespoons cinnamon

  • 4 teaspoons ground cloves

  • 2 teaspoons nutmeg

  • 1/8 teaspoons cayenne pepper

  • 2 teaspoons allspice

  • 4 teaspoons ground ginger

Tea Preparation:


To make a nice tasting cup of tea, first warm your teapot with scalding-hot water. Then place your ingredients directly in the pot (or tea ball). For a mild tea, pour 1 cup of boiling water over 2 tsp. of dried leaves or blossoms. Cover the cup with a lid or plate (this helps keep the vital nutrients and beneficial properties of the herbs in the cup and not evaporating into the air). Let steep for at least 10 minutes. Serve the hot drink “as is”, or — if you wish — flavor it with grated fruit rind, lemon juice, or honey. For a greater medicinal effect, make a decoction by gently boiling 1/4 cup of the tea blend in 1 qt. of water until about half of the water has boiled off. Drink 2-3 small cups of the tea daily.


Storing Your Tea Blends


After mixing up your favorite blend of herb tea, add them to a glass jar and store in a dark place. I use large mason jars for storing my tea blends. As a general rule, figure on about one to two teaspoons of dried herb(s) per cup of tea. (Double the amount of ingredients if you’re using fresh herbs.) And remember that you can get more flavor out of the leaves, blossoms, and berries if they are crushed before using.


Consider adding these medicinal plants to your garden and enjoy them year after year. In addition to tea blends, many of these herbs can be used for other natural medicinal needs, such as salves, lotions, tinctures and decoctions.

Thursday, April 27, 2017

Build Your Own Home DIY Without a Bank Loan: “Avoid Regulation, Crime and Floods”


homestead


Want to build a hideaway homestead, or establish your dream home?


If you set it up right, you can get everything you want out of the deal.


But there are some practical things you need to know, to make sure you will need be restricted by zoning, utility policies or legal trouble.


If you account for all these factors ahead of time, you can establish your home fortress with the maximum freedom and the best trade-offs for your area.


via the Homestead Prepper:


The best way to be prepared for a natural disaster or national emergency is to live in the manner you would hope to survive in. Self-reliant homesteads, ideally with their own sources of water, energy and food, and other necessary items.


Gardens and livestock pens can keep you sustained, but only if you put years of work into building them up, and improving your skills at managing the vital areas.


The best defense will be distance from major populations, areas carefully screened to avoid high crime areas, neighbors you can trust and rely upon, while maintaining a healthy distance from. Settling into an area with minimal restrictions and zoning laws can give you the freedom you need to build, but if poverty proliferates in the area, your regulation free homestead could quickly become a target.


You must find the healthy balance, do what you can, and plan for everything you don’t want to go wrong.


Read more:


The Prepper’s Blueprint: The Step-By-Step Guide To Help You Through Any Disaster


Strategic Relocation Guide: How To Position Yourself To Survive A Major TEOTWAWKI Event


A Green Beret’s Guide To Low-Budget Home-Defense Techniques 101: “Early-Warning Systems and Fortifications”


Elite Bunker Down in “Secure, Safe Rooms Hidden in Plain Sight”… And You Can, Too


Click here to subscribe: Join over one million monthly readers and receive breaking news, strategies, ideas and commentary.

Advanced Tactical Gas Mask

Please Spread The Word And Share This Post


Author: Mac Slavo
Views: Read by 258 people
Date: April 27th, 2017
Website: www.SHTFplan.com


Copyright Information: Copyright SHTFplan and Mac Slavo. This content may be freely reproduced in full or in part in digital form with full attribution to the author and a link to www.shtfplan.com. Please contact us for permission to reproduce this content in other media formats.


Saturday, April 22, 2017

How To Naturally Make An Essential Oil Diffuser (Plus Aromatherapy Oil Blends)

 How To Naturally Make An Essential Oil Diffuser (Plus Aromatherapy Oil Blends) | essential-oil-aromatherapy-diffuser | General Health


Aromatherapy has been shown to have a profound impact on lifting moods, purifying the air, and making a room smell great in the process.


This type of therapy interacts with the “emotional brain” or limbic system. During inhalation, odor molecules travel through the nose and affects the brain through a variety of receptor sites, one of which is the limbic system.


As much as I love to use my oil diffusers in many rooms of my home, I have begun to steer clear of the oil refills that are commercially sold as they contain artificial fragrances or the carrier oils are phthalate-laden and defeat the purpose of breathing in healthy aromas for therapy. Instead, I have found that mixing your own essential oil solution with a little vodka and a carrier oil can help you create a more natural, balanced, healthier oil solution to add to your diffusers.


Make Your Own Essential Oil Solution For Diffusers


Here’s what you need:


Because you will be combining oils, I recommend you purchase a set of essential oils. This is one of my favorite kits.


I have found that making your own essential oil diffuser is simple. All you need is a small container and a blending of your favorite oils. Ensure that the vessel you use has a small neck. This will help to prevent rapid evaporation of the essential oils. Here are some other ideas:


  • flower bud vase with a small neck

  • votive candle holders

  • ceramic vases or containers (ensure the vase is glazed inside so that it doesn’t leak)

  • empty spice jars

  • rattan reeds

A note on reeds: Rattan reeds are better to use than bamboo because the capillary action of the reeds pulls the oils up through the reed and the oil is slowly diffused into the air.


Also, an alternative to do-it-yourself oil diffusers is to consider using rice. Adding a small amount of rice to a bowl and pouring the essential oil liquid (listed above) over it will also create pleasing aromatic effect. The evaporation rate may be faster because the oils are exposed so openly, but it will work all the same. You can also make aromatherapy rice bags, as well. Here are instructions in creating this project.


Get in the Mood


Now that you know how to create essential oil liquid for your diffuser, now it’s time to get in the mood! We found the following list for essential oil combination blends used to balance moods and adapted them in order to add them to the diffuser. The originals to these blends can be found here.


1. Blends to Combat Anger


  • 12 drops Orange

  • 10 drops Patchouli

2. Anxiety Blend


  • 12 drops Lavender

  • 10 drops Clary Sage

3. Blends to Help with Depression


  • 12 drops Bergamot

  • 10 drops Clary Sage

4. Energizing Blends


  • 12 drops Bergamot

  • 10 drops Rosemary

5. Blends to Ease Loneliness


  • 10 drops Bergamot

  • 12 drops Clary Sage

6. Stress Relieving Blends


  • 10 drops Clary Sage

  • 4 drop Lemon

  • 4 drop Lavender

7. Blends to Ease the Winter Blues


  • 12 drops Orange

  • 8 drops Grapefruit

or


  • 12 drops Bergamot

  • 10 drops Clary Sage

8. Blends to Ease Fear


  • 12 drops Grapefruit

  • 10 drops Bergamot

9. Blends to Help Increase Confidence


  • 12 drops Orange

  • 10 drops Rosemary

10. Blends to Enhance Memory and Concentration


  • 12 drops Rosemary

  • 10 drops Lemon

or


  • 10 drops Peppermint

  • 12 drops Lemon

The next time you feel that your mood is”off” or that you want to enhance your memory try some of these essential oil combinations and see the positive effects. Aromatherapy is a natural way to improve and balance your moods and create a healthier environment.

Tuesday, April 11, 2017

Grid-Free Climate Control: 3 Innovative Ways To Keep Your Home’s Temperature Comfortable

Grid-Free Climate Control: 3 Innovative Ways To Keep Your Home


Spring is perhaps the best time of the year to experiment with super-efficient heating and cooling systems, since the temperature can flip from chilly one day to warm the next.


However, another reason why spring may be a good time to get those systems up and running is because temperature swings can strain our AC systems. Allow me to explain. Much like automobiles, the stopping and starting of the AC motor — again and again — consumes lots of energy and also can lead to earlier-than-expected repairs. This is especially true for homes that have a heat pump on their system.


But there are innovative, off-grid, eco-efficient ways to stay comfortable during spring, no matter the temperature. And all three can run without the grid:


1. Compost hot-water system


Whether the idea came from a Ph.D. in engineering or a backwoods farmer with a huge amount of creative common sense, I wish I could shake that person’s hand for inventing the compost water heater. The system is set up by winding a heat-capable hose through the compost pile, and then routing it back into the building that requires hot water.


Are You Prepared For A Lengthy Blackout? Get Backup Electricity Today!


Hey, it’s no secret that compost generates heat. Heck, when piles of hay and mulch are left alone, they can spontaneously combust. So, why not put that kind of thermal energy to work? Chances are that you probably have a compost pile somewhere on the homestead, right?


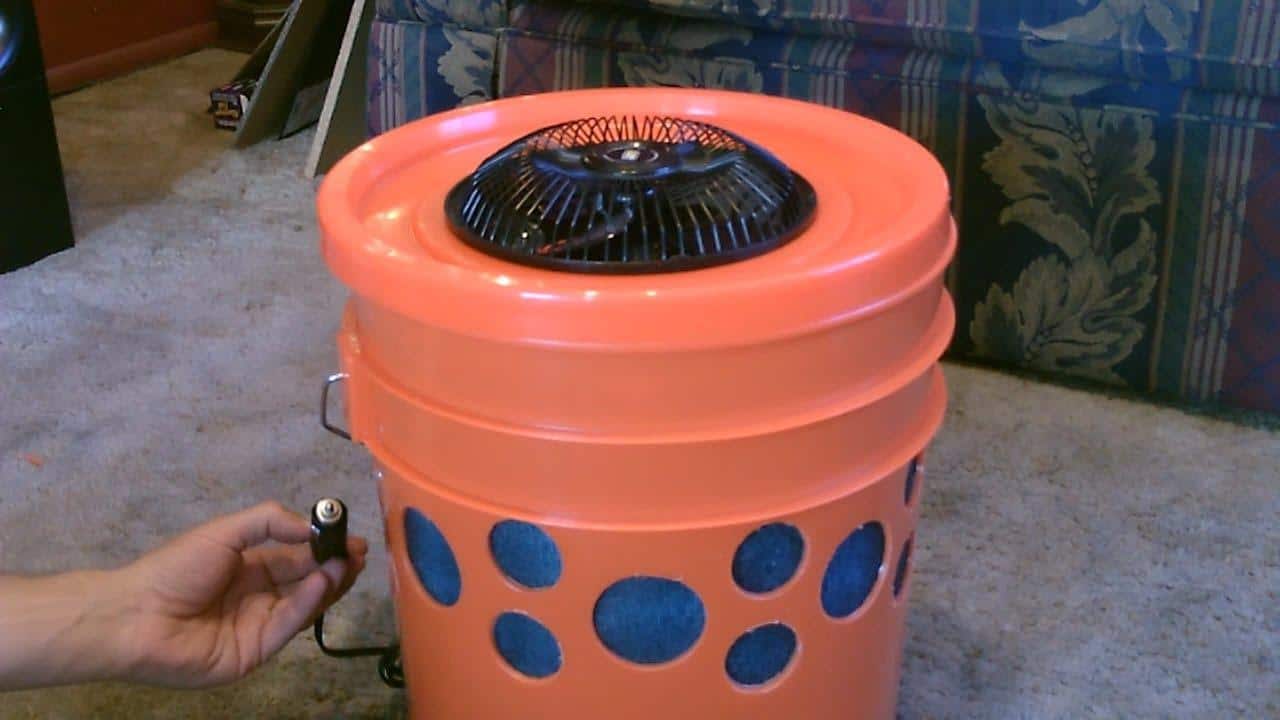
2. The 5-gallon bucket swamp cooler


For those of you who live in the west or southwestern part of the U.S., you’re probably well-acquainted with the concept of the swamp cooler. When water evaporates, it will expend a tiny amount of energy and remove heat in the process – similar to how our sweat glands work. That’s how swamp coolers work.


Obviously, this system doesn’t exactly serve those of us who live in traditionally humid summer climates, but there’s one extremely handy way to harness the science of a swamp cooler and combine it with a ridiculous level of portability. And since this thing will make even a small solar panel array barely break a sweat, I figured the bucket swamp cooler made the cut.


3. Improvised geothermal climate control


And last but not least, I give you the whole kit-and-caboodle: the improvised geothermal climate control system. This one will also require low-wattage pumps and fans, but again, solar panels ought to do the trick with this one, as well.


The system essentially works like this: Even just a few feet below the ground, temps tend to settle at around a brisk 55-60 degrees Fahrenheit, holding steadily all year-round. In fact, if you’re able to dig deep enough, temps even can approach freezing. That’s why, for this particular system, the climate-control magic is derived from its subterranean water supply. In its most basic form, the system uses cool underground water from your homestead’s well to get the job done. To learn more, check out this great article.


All you need to do is move a little water and air, and the earth itself can take care of the hard part.


Have you experimented with any of these systems? Share your tips in the section below:


Be Prepared For A Downed Grid. Learn More Here.

Wednesday, April 5, 2017

Silicon Valley Survivalist Builds DIY “Extreme Weather TsunamiBall” To Ride Out Disaster

tsunami1


Whenever seismic activity kicks up on the planet, earthquakes, volcanoes and tsunamis are triggered.


Just how big, and how devastating, depends upon chance, and the build-up of pressures within the earth.


But anyway you slice it, places like Southern California, and globally, the Ring of Fire, are in the danger zone. Many say that it’s just a matter of time.


With that in mind, survival-minded individuals and disaster preppers have been trying to get ready, and help others get ready, too.


That’s sort of what happened when Chris Robinson and his Silicon Valley friends and associates got into ‘sketching ideas for tsunami-proof shelters.’


He says his boss drove home the idea, and brought it up over and over, until he came up with any idea…


… And started building his own tsunami-proof shelter that he hoped could survive a storm of any size, and keep he and his family safe even if the vessel tumbled, or got knocked.


As a one-man crew, Robinson went to town with simple plywood, and a lot of patience, until he came up with this fantastic DIY survival vessel, dubbed the ‘Tsunamiball’, featured on one of the best off-grid sites on the web.


via Kirsten Dirksen:


A couple years ago Chris Robinson was a former Facebook and PayPal art director with no boat-building (nor sailing) experience. Then the Tsunami hit Japan (a place where he’d lived and met his wife). He happened to be working in a startup incubator at the time with some “very smart people”, including an astronaut, and everyone was sketching ideas for tsunami-proof shelters.


To be sure, Robinson’s house boat isn’t done, and frankly, wouldn’t survive a disaster of any magnitude in its current condition. It hasn’t even been tested on the water.


But he hopes to use his pet project to inspire others into thinking of better designs, and improving his along the way.


As Wired Magazine reported:


The former Facebook and PayPal art director used Adobe Illustrator to sketch his tsunamiball plan (he asked some engineers for help calculating whether it would float). “Very early in the project it became about building this interesting object,” Robinson says. “I’m not a survivalist. I don’t even have life jackets.” He does, however, have an emotional connection to Fukushima—he met his wife there in 1991, when he lived in Japan. “Half the places we went on dates are gone,” he says. Robinson plans to finish the outer shell by May, then ocean-test the vessel if he can find a crane and truck big enough to haul it over to the Pacific. And if the sphere doesn’t sink, he’ll use Airbnb to rent the tsunamiball for tidal wave-safe overnights in Palo Alto.


Whether it helps out in a disaster or not, the project is fascinating and breathtaking.


In principle, it is very similar to the ‘Survival Capsule’ that SHTF reported on a little while back:


In the wake of an extreme threat – such as a tsunami or earthquake – this capsule could be the best place to withstand the impact, no matter what.


It is water-tight. It is extremely durable. It floats, and it can withstand against the impact of super-strong winds, crashes, heat and many other factors.


As the London Guardian reports:


This capsule, which features two small porthole windows so the occupants can see what is going on around them, was created to give individual groups and families more control of their survival in emergency situation than traditional ‘safe houses.’


It is designed to float so it will never be inundated by water levels rising too high, as they do in tsunami situations.


[…]


The sphere is designed to withstand the initial impact of a natural disaster, as well as sharp object penetration, heat exposure, blunt object impact, and rapid deceleration.


How’s your plan for survival? It’s time to think one through if you don’t have one.


Read more:


This Survival Capsule Could Insulate You Against Any Disaster: “More Control Than Safe Houses”


The Prepper’s Blueprint: Your Step-by-Step Guide to Survive Any Disaster


The Ultimate Prepper Bug Out Home


Elite Bunker Down in “Secure, Safe Rooms Hidden in Plain Sight”… And You Can, Too


Are Devastating Tsunamis Headed for American Cities? “There’s Enough of a Chance”


Russia’s New ‘Nuclear Torpedo’ Can Create Giant Tsunamis And Wipe Out Entire Coastal Cities