Showing posts with label gardening. Show all posts

Wednesday, May 2, 2018

5 Gardening Myths That Seemingly Everyone Believes

5 Gardening Myths That Seemingly Everyone Believes (No. 2 Shocked Us)

Image source: Pixabay.com


We have all grown in our gardening experiences by words of wisdom from those gardeners who have come and gone before us, and we’ve even followed gardeners who have TV shows, blogs and websites dedicated to their art.


Of course, there’s a lot of advice that we’ve accepted that is nothing more than myth. This is not to say the advice is not entirely false, but it is not entirely true, either.


These myths have been around so long that even some of the experts take them to heart.


1. All organic pesticides and sprays are safe. Although it’s common sense to question how safe a pesticide is, many gardeners take organic pesticides for granted. Most of the time it is safe, but there are some natural ingredients that are just as dangerous, or more so, than commercial chemicals.


Need Non-GMO Seeds For Your Organic Garden? The Best Deals Are Right Here!


Sulphur, for example, was used by early gardeners, but it can be deadly. The same goes for warfarin, sabadilla, rotenone and nicotine, even though they are plant-based. Even pyrethrin, when used long enough, can harm you and your garden. When looking for natural alternatives, be sure to investigate their safety.


2. Fresh vegetables are far more nutritious than frozen or canned vegetables. Well, how fresh is fresh? It is true that fresh vegetables are healthier for you, but only when they are freshly picked. The vegetables you purchase in the grocery stores usually make quite the trip from the field to the shelves of the store. Sometimes the journey takes several days or even weeks to get to the final destination. Enzymes are naturally being released by the vegetables during storage and shipping, causing the vegetables to lose nutrients and minerals. However, when the produce is fresh-picked and quick-frozen, most of the vitamins, minerals and other nutrients are preserved. This is good to keep in mind for your own garden produce: If you’re not planning on eating your harvest within a short time, don’t delay in preserving it.

5 Gardening Myths That Seemingly Everyone Believes (No. 2 Shocked Us)

Image source: Pixabay.com


3. Kitchen scraps are all you need for compost. How many of us have compost bins by our gardens, and walk our kitchen scraps out there after each meal? Yet kitchen waste, if that’s all you’re using, is too strong for your garden. You need a mix of leaves (known as brown) and kitchen waste (known as green). There needs to be the correct balance between the two, meaning having more brown than green. The breakdown of these two things creates compost. You can always put extra kitchen scraps into a worm box, or vermicomposter.


4. Watering vegetable plants in the sun will kill them. How often have we been told this one? It’s definitely one believed by many experts. The most common reason gardeners accept this myth is on the premise that the water acts as a magnifying glass. The sun’s rays will hit the water and they will burn the vegetable plants, especially the leaves.


Seamazing: The Low-Cost Way To Re-mineralize Your Soil


The truth is the water isn’t strong enough to magnify the sunlight enough to the required heat needed to burn the leaves and plants. Now, this doesn’t mean high noon is the perfect time to water your garden. Be reasonable.


5. Organic gardens are more expensive than traditional gardens. This myth has become more common as people are starting to want more and more organic products and food. Organic produce from any grocery store is more expensive — it’s true. Growing your own organic vegetables are not, however. When you cut out any commercial fertilizers and pesticides, you are saving money. By making your own mulch and compost from scraps and leaves from your yard, you will be saving even more money. Re-use containers and use mixtures of hot soapy water, garlic and hot pepper to keep away unwanted pests. Dead leaves can be used, along with lawn cuttings and scraps, to make fertilizer. Save seeds from your current produce to use for next season. Dry the seeds out and store them in a cool, dry place away from the sun. This is a great way to have a successful garden, as the healthy plants have healthy seeds.


The best way to garden is to do your research and speak to experts and fellow gardeners alike. The more you know, the better your garden will be. You will be able to decide what is true and what isn’t, and your garden will thank you.


What myths would you add to this list? Share your myths in the section below:


Every Spring, Gardeners Make This Avoidable Mistake — But You Don’t Have To. Read More Here.


The post 5 Gardening Myths That Seemingly Everyone Believes appeared first on Off The Grid News.

Thursday, April 19, 2018

Five “Life Extension” Garden Vegetables To Plant In 2018

There’s no doubt about it: the health benefits of nutrient-dense, fresh, organic produce is a keyreason to break out the gardening tools each season.


Purchased produce simply doesn’t have as many nutrients as the veggies that come from our gardens. Commercial growers typically choose varieties that mature quickly, produce heavily, and give a uniform, visually-appealing fruit–all factors that come at the cost of nutrient density. As well, commercial growers often engage in practices that strip nutrients from the soil, which means the vegetables they grow have nowhere to absorb nutrients from. Finally, harvested vegetables


“Getting high-quality nutrients from key garden vegetables is the single best way to maximize genetic expression for longer and healthier life.”


lose moisture and nutrients over time, as part of a process called respiration. The longer veggies sit between harvest and table, the more nutrients they lose.


For these reasons, freshly-picked home-grown vegetables are inherently healthier than purchased vegetables. That said, you can maximize the health benefits of your garden by planting those veggies that are chock full of nutrients. There are five vegetables, in particular, that pack a powerful nutrient punch: sweet potatoes, broccoli, brussels sprouts, dark leafy greens, and garlic.


Sweet Potatoes


Sweet potatoes are the most nutritious root veggies out there. They’re terrific for our digestive system since they’re high in fiber and they have a high phytosterol content, which may help prevent duodenal and gastric ulcers. These root veggies are also high in beta-carotene (Vitamin A), which helps maintain the health of our skin, mucous membranes, immune system, and eyes. High amounts of antioxidants prevent cell damage by free radicals, which in turn protects the body against cancer. Sweet potatoes also contain Vitamin B, Vitamin C, and several minerals, including iron, calcium, and selenium.


Sweet potatoes are tropical plants that love sun, heat, and humidity. Best in zones 8 and above, but you can successfully grow sweet potatoes as far north as Zone 3 if you keep the soil toasty under plastic sheetingduring early summer. As long as they stay warm, and have plenty of room to run their vines, sweet potatoes are easy to grow.


Broccoli


Broccoli is a powerhouse, providing us with protein and fiber as well as an array of vitamins (A, C, E, K, and some B vitamins including folate) and minerals (iron, potassium, calcium, selenium, and magnesium). The nutrients in broccoli contribute to:


  • Heart health, reducing cholesterol and heart disease.

  • Healthy, dense bones.

  • A healthy immune system.

  • Healthy eyes and the prevention of age-related macular degeneration.

  • The reduction of free radicals, which can assist in keeping our bodies cancer-free.


Broccoli also contains non-nutritive antioxidants and phytochemicals that have been shown to block cancer in its early stages.


Broccoli isn’t difficult to grow, but it does require a little bit of planning and care. It’s a cool weather crop that will bolt in the summer heat. For that reason, startbroccoliearly: seeded or even transplanted out about two weeks before the last frost date. During the summer months, keep broccoli shaded and mulched so that it stays as cool as possible. Water regularly and keep an eye on any potential pests.


Brussels Sprouts


Brussels sprouts (like broccoli, kale, mustard and collard greens, also discussed here) are members of the brassica family of vegetables. Brassicas contain phytochemicals (specificallyglucosinolates) and carotenoids-antioxidants, both of which have been shown to reduce the risk of cancer. Additionally, Brussels sprouts are rich in Vitamin K, which helps our blood clot and our bodies maintain healthy bones. These veggies are also high in Vitamin C and fiber and have a host of other vitamins and minerals, including Vitamin B6, thiamine, potassium, folate, iron, and manganese.


Like other brassicas, Brussels sprouts are a cool weather crop that doesn’t perform well in hot, dry weather. In fact, sprouts that mature when it’s hot outside may be flimsy and bitter. It’s best to start Brussels sprout seeds indoors in May or early June. Care for the seedlings indoors until August, or roughly 45-60 days beforethe first frost date. Once planted out, use mulch to protect the plants during summer’s last hot days. Brussels sprouts are slow to grow but well worth it.


Dark Leafy Greens (Kale, Mustard and Collard Greens, Spinach, Chard)


Kale, mustard greens, and collard greens are all members of the brassica family, and as such, have the same cancer-fighting phytochemicals and carotenoids-antioxidants as Brussels sprouts and broccoli. Further, dark leafy greens of all types are rich in calcium and iron, and also contain Vitamins A, C, E, and K, as well as fiber, folate, and magnesium.


Most dark, leafy greens are fast-growing cool weather crops. If planted in early spring, before the risk of frost has passed, they’ll be ready to harvest before the heat of summer causes them to bolt. The exception is Swiss chard, which–although also quick and easy to grow–tolerates heat well enough to last into the fall.


Garlic


The health benefits of garlic are well known. It can boost the immune system, reduce blood pressure, lower cholesterol levels, and detoxify heavy metals in our bodies. As well, garlic contains antioxidants that may help prevent Alzheimer’s disease and dementia.


Garlic is relatively easy to grow as long as you plant itat the right time. Garlic cloves are best overwintered in the ground, to sprout in the spring or you may try planting as soon as the ground is workable in late winter. Other than standard watering and weeding, keep an eye on your garlic plants for flowers. Should blossoms start to form, cut them off so that the plant directs its energy to its bulb.


Do you have any tried and true tricks for growing these five nutrient-dense veggies? If so, let us know in the comments below.


Saturday, April 14, 2018

Create a No-Till Garden and Retire Your Tiller Forever

Create a No-Till Garden and Retire Your Tiller Forever | 1-No-Till-Garden-Soil-Front-Lawn-Vegetable-Garden-Design-Custom | Agriculture & Farming Organics Special Interests


By Garden Therapy


It is a wonderful feeling to discover a gardening hack that saves you time and effort without decreasing the health of your garden. Imagine the extra time you would have if you never tilled your garden again. Guess what? Not only can you save time with a no-till garden, you can improve the quality of your soil that way too!


My friend Shawna Coronado is a talented gardener, promoter of green lifestyles, and garden-hack pro. Shawna joins us today to share the details on how to create a no-till garden from her wonderful book 101 Organic Gardening Hacks. If you like this time-saving, soil-improving, organic gardening hack, you’ll love the other 100!


Retire Your Tiller


By Shawna Coronado


If you love your soil, stop flipping it over.


Sometimes the best way to improve something is to let it be. A no-till garden is a perfect example. And creating one also means less work for you. Imagine building a large garden without having to turn the soil over in your garden beds.


Turning soil kills the microbes living beneath the ground that contribute to a healthier root system by living symbiotically with your roots. There are billions of bacteria, millions of fungi, thousands of protozoa, and scores of other nematodes and organisms found in one small tablespoon of healthy soil. Hacking your garden soil with a few simple no-till tips can make for hugely successful growing because you keep those vital creatures alive and happy in your garden beds.


A no-till garden has other benefits. Because you are consistently smothering weeds with mulch or compost, they struggle to grow there, and an undisturbed, enriched soil requires far less fertilizer in order to support successful plants. The no-till technique works in almost any garden space and can help grow extremely healthy organic vegetables and herbs.


How to Create a No-Till Garden


Create a No-Till Garden and Retire Your Tiller Forever | 1a-No-Till-Garden-Soil-soil-addition-Custom | Agriculture & Farming Organics Special Interests


Instead of turning your soil over for a garden, start by removing all of the grass, either by stripping the sod or smothering the grass (see Hack 79: “Kill Grass by Smothering It”).


  1. Put down a 2-inch layer of rotted manure or compost on top of the bare soil. Do not turn the soil over.

  2. Dig holes to plant your plants.

  3. Mulch the garden the first year with wood chips or another natural mulch, such as pine needles, rotted leaves, or straw.

  4. After the harvest at the end of the season, do not pull out the vegetable or herb plants by the root; cut their stems at the base of the soil and leave the roots in the ground to overwinter and eventually rot. Compost the cut plant matter.

  5. Next planting year, cover the garden with another 2-inch layer of compost.

  6. When planting new vegetables and herbs, only pull out roots from the previous year if they block an area for a new plant. Be sure to rotate the crop so that no plant from the previous season is planted in the same location in the current year.

    Create a No-Till Garden and Retire Your Tiller Forever | 1-No-Till-Garden-Soil-Front-Lawn-Vegetable-Garden-Design-Custom | Agriculture & Farming Organics Special Interests

  7. In your third planting year, follow the same practices, but add a layer of mulch instead of a layer of compost.

  8. In your fourth planting year, follow the same practices, but add a layer of soil instead of a layer of mulch.

  9. In the fifth planting year, follow the same practices, but add a layer of rotted manure instead of a layer of soil.

  10. In the sixth planting year, follow the same practices, but add a layer of compost instead of rotted manure.

  11. Continue every season layering up the compost, mulch, soil, and rotted manure without ever turning over the soil.


Create a No-Till Garden and Retire Your Tiller Forever | Shawna-Coronado-Author-of-Grow-a-Living-Wall-shares-How-to-Build-a-Vertical-Garden-600x563 | Agriculture & Farming Organics Special Interests


Shawna Coronado is an author, columnist, blogger, photographer, and spokesperson for organic gardening, green lifestyle living, and culinary preparation who campaigns for social good. Shawna’s goal in authoring gardening and green lifestyle books is to promote a world initiative to encourage healthy and sustainable living. She was featured as a Chicago Tribune “Remarkable Woman” and speaks internationally on building community, simple urban garden living, and green lifestyle tips for the everyday person. Shawna lives in the western suburbs of Chicago where she has a famous front lawn vegetable garden. You can learn more about her at www.shawnacoronado.com.


The post Create a No-Till Garden and Retire Your Tiller Forever appeared first on The Sleuth Journal.

Monday, April 2, 2018

7 Common Household Items That Make For GREAT Garden Fertilizer

7 Common Household Items That Make For GREAT Garden Fertilizer

Image source: Pixabay.com


Self-sufficient gardeners avoid the use of pre-packaged fertilizers and soil from the store. While fertilizers are easy to use, off the grid living means a store isn’t always nearby, and you might not have the means to purchase the items. Chances are you have plenty of items in your house that can be used to fertilize your garden, saving you money and time. Let’s take a look!


1. Coffee grounds. Do you start the day with an overflowing cup of coffee? Those dried coffee grounds add nitrogen, potassium and magnesium to your garden, all vital nutrients for the growth of your plants. However, it is important to remember that coffee grounds can change the pH of your soil, possibly affecting plants that need a delicate balance.


2. Tea bags. If you aren’t a coffee drinker, tea bags have a very similar effect to the soil as coffee grounds. You have to remove the tea grounds from the bags and allow them to dry before application. Many gardeners notice tea grounds are particularly beneficial around tomatoes.


3. Egg shells. Your chickens can contribute to more than just breakfast. Egg shells are a fantastic calcium source. Remember, you can grind them up and mix into their feed if you notice the shells becoming soft.


After breakfast, wash out the shells and let them dry. Break the shells into smaller pieces and put them in the ground when planting tomatoes. You can also add them around the base of already planted tomatoes. Tomatoes require more calcium than other plants.


4. Fish scraps. Early Pilgrims had trouble growing crops when they arrived in North America, mostly because of nutrient-lacking soil. The Indians who came to their aid, including the famous Squanto, taught the Pilgrims a trick – burying fish with the seeds. You don’t need to plant multiple fish inside of your garden, but using the scraps can help.


If you have an aquarium, don’t dump the water down the drain. Use this water to hydrate your garden beds and potted plants. The fish waste provides vitamins to the plants without any extra steps for you! If you filet a fish, save the bones and scraps. Some gardeners like to puree them with water and milk, creating a strong fertilizing mixture. You could bury scraps as well,


5. Wood ash. Those who have a wood stove or fireplace have a free source of fertilizer, adding potassium and calcium carbonate to the soil. Remember never to use the ash if you added anything else! Ash is an easy way to increase your soil pH, so don’t use it if your soil is alkaline. Ash is also known for keeping slugs away from your plants.


6. Bananas. Do you have kids who eat bananas like candy? Your garden loves banana peels, as well! Putting them in your compost pile is a good first step. You can also put them right into your garden to give the soil a quick potassium boost. Peels degrade fairly quickly, and they don’t produce a nasty odor. A benefit of using banana peels is that they repel pests!


7. Powdered milk. Do you have powdered milk in your cabinet that is past expiration? Don’t throw it away! You can mix one part milk into four parts water. You can also use expired milk in your fridge. Milk is a fantastic source of calcium for more than just humans! It also contains proteins, vitamin B, and sugars that improve the overall health of the plant. Plants that are failing to grow to their full potential can benefit from a boost in calcium. Milk also helps with blossom end root, commonly ailing squash, tomatoes and pepper plants.


There are so many different household items that fertilize your garden. Instead of spending money at the store, raid your cabinets! Remember to put your vegetable and fruit scraps into the compost to save money and add nutrients to your garden.


What would you add to our list? Share your additions in the section below:

Tuesday, March 20, 2018

Dirt Cheap: The Best Frugal Gardening Ideas On The Internet

Dirt Cheap: The Best Frugal Gardening Ideas On The Internet | The-Best-Frugal-Gardening-Ideas-on-the-Internet-450x300 | Agriculture & Farming Organic Market Classifieds Organics Special Interests


With the price of healthful groceries going no place but up, lots of thrifty folks are starting a garden to save money on their bills this year. But what about the money to start a garden? It can be a very expensive undertaking, especially if you’ve never gardened before in your particular location.


I’ve been researching ways to start my own garden as inexpensively as possible and thought, “HEY!!! I know some other folks who would absolutely love frugal gardening ideas!” So…here they are.


Step One: What Kind of Garden Are You Going to Grow?


Of course, the very first thing to decide is what type of garden will work best for your situation. This will depend a lot on your soil, your climate, your skill set, and what you have easy and inexpensive access to. Following are some articles and books that will help you make your decision.


Pallet Gardens: Simple, Easy, Free


Straw Bale Gardens Complete


How to Build a Recycled Greenhouse


Create an Instant Garden with Sheet Mulching


Lasagna Gardening: A New Layering System for Bountiful Gardens: No Digging, No Tilling, No Weeding, No Kidding!


DIY Metal Raised Beds


DIY Super Easy Raised Garden Bed for Under $30


How to Build a Raised Garden Bed for $12


For those who aren’t build-y: Big Bag Fabric Raised Beds (I have used these with great success for veggies with shallow roots and as a bonus, you can use them on concrete if you’re gardening on a patio.)


Using Pallets to Make Free Raised Garden Beds


Square Foot Gardening: The Revolutionary Way to Grow More in Less Space


15 Fruits and Veggies You Can Grow in a Bucket Garden


PVC Drip Irrigation System for Your Garden


How to Save BIG on Lumber Supplies for Your Square Foot Garden


Step Two: Plan Your Garden


Now that you have figured out how you’ll grow your food, you need to figure out what to grow. A lot of that depends on your goals. Are you just hoping for salad this summer? Or are you planning to grow an entire year’s worth of food for your family? These links will help you make some decisions!


FREE Garden Planning Printables


How Much to Plant for a Year’s Worth of Food


Granny Miller’s Garden Planner for Home Preservation


An Inspiring 5000 Square Foot Garden Plan


Last Frost Date Seed Planting Worksheet


Step Three: Start Your Seedlings


While it’s easy and less hassle to buy your seedlings already started, it costs a whole lot more. One plant can be the equivalent of an entire package of seeds!  Starting your own seedlings is not that difficult and you don’t need an indoor growing operation that marijuana drug lords would envy.


Seed Starting 101


Frugal Seed Starting Station


DIY Seed Starting Mix


10 Seed Starting Hacks


20 Frugal Repurposed Seed Starting Containers


How to Make Newspaper Seed Starting Pots


Another Way to Make Seed Starting Pots from Newspaper


Chicken Manure Tea for Seedlings


Why Your Seeds Aren’t Germinating


Step Four: Amend, Create, or Prepare Your Soil


No matter how sturdy your seedlings or how efficient your beds, your garden is only as good as your soil. These tips will help you, whether you’re amending what exists, creating soil, or preparing your soil to recieve seedlings.


Know Where You’re Starting Out: Test Your Soil


How to Make Your Own Garden Soil and Compost


Create an Instant Garden with Sheet Mulching


10 Tips to Improve Your Soil


Using Eggshells in the Garden


Using Coffee Grounds in the Garden


Build a Compost Bin from Pallets


Is Your Soil Getting Enough Calories?


Bonus: Pest and Weed Control


You don’t have to break the bank to keep weeds and pests at bay.  Many of the things you need are things you’d normally throw in the trash. Other DIYs are chemical-free and thrifty to make.


Natural Pest Control in the Garden


5 Ways to Naturally Control Weeds


Natural Flea Beetle Control


The Organic Gardener’s Handbook of Pest and Disease Control


Repel Insects Naturally with This All-Purpose Garden Spray


Using Banana Peels in the Garden to Repel Pests


Bonus Bonus: Miscellaneous Frugal Gardening Awesomeness


These resources didn’t fit into any of the above categories but I found something useful for my frugal gardening efforts in every single one. So, I figured you guys would like them too!


10 Things That Can Be Recycled for the Garden


Cheap and Easy Gardening Tips


The Vegetable Gardener’s Bible


The Top 10 Plants for Companion Gardening


Vegetable Gardening Basics


DIY Garden Hose Repair


7 Budget-Friendly Garden Tips


Build a Simple Cucumber Trellis


21 Gardening Hacks


Frugal and Free Landscaping and Garden Ideas


25 Cheap Gardening Tricks for Self-Reliance


9 Gardening Supplies You Can Get for Free


How to Start a Garden on a Budget


70+ Frugal Garden DIYs


80+ Items You Can Compost


Bonus Bonus BONUS: A Peek at My Personal Gardening Library


These are the books I have on my own bookshelf in the gardening/homesteading area. I’ve included links so you can find them on Amazon. All links are to the newest editions, so the books may not look the same as the ones you see on my shelf.


Lasagna Gardening: A New Layering System for Bountiful Gardens: No Digging, No Tilling, No Weeding, No Kidding!


The Backyard Homestead


Straw Bale Gardens Complete


The Woodland Homestead


Urban Farming


Western Garden Book


The Encyclopedia of Country Living


Building a Shed


Organic Gardening (There are only a few used copies of this one on Amazon)


The Vegetable Gardener’s Bible


Craft Wisdom and Know-How


The Taylor Guides


Not shown because I let someone borrow them or read the e-version:


All New Square Foot Gardening, Second Edition: The Revolutionary Way to Grow More In Less Space


Garden Like a Ninja


What are you waiting for?


If you are into the preparedness lifestyle, I’ve mentioned again and again what a terrible idea it is to wait until after a disaster to begin learning to garden. I’ve had a couple of bad years in a row, and I’m determined to make this one better. I have that luxury now, because groceries are plentiful, albeit pricey, at my local store.


Clearly, budget isn’t an issue! There are so many things you can do on a dime that there’s absolutely no reason for you to delay starting a garden for self-reliance.


Do you have any frugal garden tips you’d like to share? Your comments could be included in a future round-up! Post them in the section below!


The post Dirt Cheap: The Best Frugal Gardening Ideas On The Internet appeared first on The Sleuth Journal.

Thursday, March 8, 2018

Odd-Ball, Delicious Vegetables You’ve Never Grown


It’s gardening season throughout North America, which means it’s nearly time to plant the tried-and-true staples you’ve always enjoyed. Lettuce. Tomatoes. Potatoes. And Beans.


This year, though, why not try something different? Why not grow something that is new, delicious, fun, and even quirky?


This week’s guest on Off The Grid Radio is Niki Jabbour, an award winning writer and the author of the new book Niki Jabbour’s Veggie Garden Remix: 224 New Plants to Shake Up Your Garden and Add Variety, Flavor, and Fun.


Niki tells us all about:


  • Alternatives to lettuce that you’ll love.

  • Bush berries that thrive in the garden.

  • Weird-looking but delicious fruits your family will enjoy.

  • Tomato varieties you should try.


Are you ready to try something new this year? Niki is here to help!


Friday, February 23, 2018

This Do-It-Yourself Garden Hack Is The Secret To An Abundant Garden

This Do-It-Yourself Garden Hack Is The Secret To An Abundant Garden | vegetable-garden-soil | Agriculture & Farming Organic Market Classifieds Organics Special Interests


My grandfather always had a robust garden filled with vegetables. His secret was rich, nutrient dense soil. He taught me that the plants we grow and soil have a symbiotic relationship. If the soil has nutrients, the plants will thrive. That said, many gardeners forget this vital tip and tend to lean towards chemical fertilizers as a way to quickly replenish their soil and grow their plants. Overtime, this can can cause the soil to become depleted of vital nutrients because the fertilizers kill or leaches out the nutritional aspects of the soil. As well, chemical fertilizers are not welcoming to microorganisms that live in the soil. You want to ensure the fertilizer method you use is biodynamic and efficient in the amount of materials used versus the amount of coverage area.


Why is Soil So Important?


Foremost, it is important to understand what soil actually is. According to the Soil Science Society of America, “Soil is not dirt.  It is a complex mix of ingredients: minerals, air, water, and organic matter – countless organisms and the decaying remains of once living things.  Soil is made of life.  Soil makes life.  And soil is life.” In order for plants to grow to their optimum capacity, they need nine different nutrients present in the soil.  While most of these elements and nutrients are naturally found in soil, sometimes they can become depleted and need to be added to keep the soil healthy.


  • Carbon – found in air and water

  • Hydrogen – found in air and water

  • Oxygen – found in air and water

  • Nitrogen – blood meal, fish emulsion, manure

  • Phosphorus – bone meal, rock phosphate, superphosphate

  • Potassium – greensand, mutriate or sulfate of potash, seaweed, wood ashes

  • Calcium – gypsum, limestone, oyster shells, slag

  • Magnesium – dolomite, magnesium sulfate (Epsom salt)

  • Sulfur – sulfur, superphosphate


Creating a no-till garden or utilizing the sheet mulching method can add these vital elements and nutrients back to the soil. This is a type of whole-system approach to gardening that helps feed the soil while vegetables and crops are growing. Another way to do so is by using an old-fashioned compost tea will help restore many of these essential nutrients, microorganisms and vital minerals naturally.


It should be stated that the elements listed above are not the only things that should be present in the soil. Microbes such as protozoa, fungi, algae and bacterias should also be present, as they affect soil structure and fertility. In fact, millions upon millions of microbes are present in healthy soil and it is important to ensure they make your soil their home. Ensuring that you have a lot of biomass present in your soil will keep them thriving.


Compost Tea


Compost tea takes the beneficial bacteria and fungus present in compost and exponentially increases them through aeration and sugars. These bacteria and fungus are critical in root establishment – and the more bacteria you have in your soil, the better. In fact, if you diversify your bacterias, you will make a healthier soil and compost tea is one of the easiest ways to do this.


Benefits of Compost Tea


  • Increases root development

  • Suppresses plant diseases

  • Creates a biodiverse soil food web

  • Encourages plant growth and vitality

  • Increases plant yield


The equipment you will need to make compost tea is as follows:


  • 5-gallon bucket

  • An aquarium pump large enough to run three bubblers or air stones

  • Several feet of tubing

  • A stick to stir the mixture

  • Something to strain the tea, like an old pillowcase or nylon stocking


Tess’s Compost Tea


Note: I will also add some earthworm tea that I have from my earthworms and this adds even more nutrients to the brew!


  1. Add water to a 5-gallon plastic bucket. If you are using tap water, allow water to sit for 24 hours in order for chlorine and other chemicals to dissipate.

  2. Add liqui ingredients to water in 5-gallon bucket and stir until incorporated.

  3. In pillowcase or nylon stocking, add dry ingredients (rock dust, inoculant, manure, worm castings, etc.) and tie onto stick and add to bucket.

  4. Turn on aquarium pump with hose attached and oxygenate water for 18-24 hours. This will help the beneficial bacterias, minerals and sugars activate.

  5. Periodically check on brew. There should be a nice foam at the top.

  6. After 24 hours, turn off pump and remove dry ingredients (add to compost pile). Use compost tea as a foliar spray or root drench.


Note: Do not over-brew your compost tea. Twenty four hours is all it needs to get the protozoa and fungi kickstarted into reproduction. 


You can use the tea as often as you wish. I used this tea once a month on my garden, or when I thought the plants needed a little extra TLC. In fact, you can also use compost tea to prevent plant shock by soaking new plants in compost tea to add beneficial soil microorganisms right before it gets planted. used it as a foliar spray and as a root drench and my plants thrived. After a three month period, I was very impressed with the soil. It was fluffy, retained moisture and I noticed more beneficial insects coming around more. Another highlight of using compost tea was when harvest time came, the vegetables tasted sweeter than usual. I’m not sure if this was a result for the compost tea or just a fluke, but I felt that it had to be mentioned. As well, I had no issues with molds or diseases this year and believe it to be a result of the compost tea I used. This is by far the easiest way to get essential nutrients quickly into the soil, and I love that it can also be used as a foliar spray. As well, the initial investment of compost tea ingredients will provide for many uses; so I can make compost tea all year with the ingredients that I purchased in May!


Once again, my grandfather was right about giving the soil what it needs to thrive and proved it by the bountiful harvests he had year after year. I highly recommend using this in preparation for your upcoming gardens. I have had nothing but success with this natural fertilizer method and look forward to my next harvest.


The post This Do-It-Yourself Garden Hack Is The Secret To An Abundant Garden appeared first on The Sleuth Journal.

Wednesday, February 21, 2018

No Yard? No Problem! You Can STILL Grow Food!

No Yard? No Problem! You Can STILL Grow Food! | noyardnoproblem | Agriculture & Farming Off-Grid & Independent Living Organic Market Classifieds Organics


Everyone is talking about growing their own food. Lots of people are starting backyard gardens, filling pots on balconies and patios, and even starting little farms in the suburbs.


But not everyone has outdoor space. What if you are living in an apartment and have no place to even put a pot for a tomato plant? Does this mean you are completely at the mercy of other people if you want fresh food?


No!  There are quite a few things you can do to produce your own food, even without a backyard or patio.


Here are two solutions that will work for nearly anyone, anywhere.


Windowsill garden


If you have a sunny windowsill, you can grow herbs and greens. Plants with shallow root systems can thrive in a small pot.


  • Garlic Greens: Plant individual cloves of garlic, pointy side up.  Once they grow, you can snip off the greens and use them like chives or green onion tops.

  • Microgreens: In a shallow tray filled with about 2 inches of damp potting soil, sprinkle seeds like radish, kale, Swiss chard, beet, basil, and dill. Add a thin layer of soil on top of the seeds. Place them in a sunny window, but a cool place (about 70 degrees Fahrenheit) and mist them with water once or twice per day.  Harvest when they are about 2 inches tall by snipping off the leaves with scissors. (Leaving the roots intact will allow for more harvests in the future)

  • Green Onions:  Plant green onions in a shallow pot. Place them in a sunny windowsill and keep them evenly watered. When the plant is about 4-6 inches tall, they can be harvested in full, including the white bulb at the bottom.

  • Lettuce: Lettuce seeds require similar conditions to microgreens, but need to be planted a bit deeper and further apart.  Use a planter with good drainage and place holes about 4 inches apart. Sprinkle a few seeds in each hole. In about 3 weeks, thin the plants, leaving the largest seedling.  When it’s time to harvest, take the outer leaves only to allow for repeat harvests.

  • Herbs: A warm, sun-filled window sill is the perfect habitat for herbs like chives, basil, rosemary, parsley, mint, and thyme. Look for pots with good drainage that are at least 6 inches deep.  Keep the herbs moist initially but after they’ve sprouted and begun to get leaves, they prefer slightly dryer soil.  Harvest by clipping the leaves on an as-needed basis.


Sprouting


Sprouting can take a dormant seed and turn it into a nutritional powerhouse in a couple of weeks.


In her book, The Pantry Primer, Daisy Luther explains how to sprout seeds:


Probably the very most common sprout container is a Mason jar with a screen over the top. However, this isn’t the simplest method.


There are inexpensive trays that are specially made for sprouting darned near anything successfully. My set up is a stack of trays that measure 5×6.  You can stack as many of them as you want to. 


The tray’s bottom is made of small holes for drainage. The process couldn’t be simpler.


  • Rinse your seeds. Remove any little bits and pieces that aren’t seeds, like stems, twigs, pebbles, etc. (Think about rinsing beans before you soak them and pulling out the yucky bits– this is the same thing!)  Use a mesh sieve and rinse the seeds until the water runs clear.

  • Soak your seeds. Generally, 1 part seeds to 3 parts water is a good ratio. Each type of seed has different soaking time requirements, so you’ll have to look this up based on what type of seeds you are sprouting. If you are getting this information online, it’s a good idea to write down your times and any special instructions on your seed container. Most seeds soak for 8-12 hours.

  • Skim off floaters. If you have any seeds floating on top of the water, give them a gentle push to see if they sink down with their buddies. If they float back up to the top, skim them off and discard them.

  • Rinse your seeds. Sprouting isn’t extremely high maintenance because the “crop” is small.  However, 2-3 times per day, you have to rinse your seeds.  This only takes a few minutes. Use cool water – not cold – just cool.  org recommends using high water pressure to oxygenate your seeds. I like the sprayer on my kitchen sink for this purpose. In very hot weather, use the coldest water that comes from your taps.

  • Drain your seeds. It’s vitally important to drain your seeds well each time you rinse. Excess water will cause mold or mildew. I usually shake the seeds in their tray to remove as much water as I can.

  • Let them sprout. For the next 3 days, continue rinsing and draining your seeds 2-3 times per day. Be sure to put them in a place with good circulation. Seeds need to breathe too.  If you can safely put them outside, they’ll get great circulation there. Mine live on the kitchen counter with the ceiling fan on.  Don’t close them up in a cupboard if you want an abundant crop of seeds.

  • Photosynthesize your seeds. After 3 days of rinsing and draining, now it’s time for the fun part: watching them become green!  If you haven’t been exposing them to light, now is the time.  Don’t put them in hot, direct sunlight.  They only need a bit of indirect light. It doesn’t take much light at all for them to green right up. I’ve read that even fluorescent lighting will do the trick, but I always use sunshine.

  • Continue rinsing and draining. You’ll continue the rinsing and draining process described above for 2-3 more days, at which point most of your sprouts will have sweet little green leaves.

  • Remove the hulls. On the last day before harvesting your sprouts, you need to remove the seed hulls. The hull is the hard exterior of the seed that split open when the seed began to germinate. To remove them, put your mass of sprouts into a big bowl of cool water and loosen them up with your fingers.  The hulls will rise to the top and can be discarded or put on the compost pile.  Swoosh your sprouts around in the bowl to get all of the hulls out.

  • Do one more rinse and drain cycle. Let your hull-less sprouts go through one more cycle before you harvest them

  • Harvest and eat sprouts. Rinse the sprouts one last time and drain them very thoroughly before putting them in the refrigerator.  Put them in a closed container and eat them within 3-5 days.


What can be sprouted? Nearly anything, but especially delicious are beans, peas, radishes, broccoli, and grains, like barley, oats, and wheat.


Sprouted seeds are delicious eaten raw.  Top salads, sandwiches, and wraps with sprouts for a big bump in nutrition.


Bean sprouts are heavier and denser.  They stand up to light steaming and can be added to a stir-fry for the last couple of minutes over the heat.  Don’t overcook them or they will be gummy and unappetizing.


Sprouted grains can be steamed lightly, then topped with milk, fruit, and maple syrup for a hot breakfast. They can also be added to baked goods to increase the nutritional content.


Anyone can increase sustainability


Don’t let anyone tell you that you must have acreage in the country to increase your personal sustainability. As long as you’re creative and refuse to be discouraged, you’ll be surprised to learn how much of your own food you can produce anywhere you happen to hang your hat.


Do you grow food indoors? Share your ideas in the comments below to inspire others!


The post No Yard? No Problem! You Can STILL Grow Food! appeared first on The Sleuth Journal.

Monday, December 18, 2017

Inexpensive Ways To Help Potted Plants Survive Winter

Inexpensive Ways To Help Potted Plants Survive Winter

Image source: Pixabay.com


Raise your hand if you’ve ever scored a massive deal at your local nursery at the end of the gardening season. Keep your hand up if those massive deals were on half-dead plants in plastic containers.


I did that once. I couldn’t resist all those dirt-cheap perennials that would keep me in strawberry rhubarb pies until my dotage. But I should have known better. I’m always in overwhelm mode in late summer and fall, trying to keep up with the plants that still need tending as well as with harvesting and preserving produce and getting ready for winter. Taking on another task, like figuring out where to plant perennials and actually getting them into the ground, was not a smart idea. And so, confession time: I didn’t plant any of them. They just sat there in their flimsy plastic pots all winter. In the spring, the peonies somehow, miraculously, sent out shoots and I got those into the ground. The rest looked beyond hope and I tossed them into the compost pile.


I’ve since learned that there are ways to overwinter plants in pots regardless of whether they’re geriatric escapees from the nursery or potted plants that you’ve had in your garden all season long.


Why Not Just Overwinter in Pots?


There are several reasons why plants have a hard time surviving the winter in containers–and most are related to the plant’s roots.


First, roots are typically hardy to two zones warmer than the plant. If, for instance, your plant is hardy to Zone 4, the roots are only hardy to Zone 6. Roots don’t have to be as tough because they’re protected by the soil. However, the small amount of soil in a pot doesn’t provide enough insulation to adequately protect roots.


Second, pots are more susceptible to freeze/thaw cycles because that small amount of soil can warm up very quickly. If you live in a colder zone, plant roots will freeze regardless of whether the plant is in the ground or in a pot. If the roots are hardy to your zone, frozen roots are part of the plant’s life cycle and nothing to worry about. However, while roots might freeze, they don’t go dormant. When the ground warms up enough, tender new roots will grow. But those young roots don’t have the ability to withstand colder temperatures; they will die when it gets cold again. This process of producing new roots that die off shortly afterward can seriously weaken the plant. It’s actually better for roots to remain consistently frozen (or at least consistently cold) all winter long.


Third, if your containers are left on a flat surface the frost, ice, and snow that accumulates on the pot’s soil can lead to root rot. As temperatures fluctuate, that frozen moisture thaws and saturates the pot. Once the temperatures dip again, the wet soil freezes. And the next time a thaw cycle hits, more ice and snow thaws and is added to the pot’s already saturated soil.


There’s no doubt that potted plants have it tough in the winter. But as the story of my peonies shows, they can pull through extended cold spells. Still, rather than just cross your fingers and hope for the best, there are things you can do to help your potted plants make through the winter.


Bring Them Inside


This seems like the most obvious suggestion, but you need to be careful about where exactly you move your plants to. Since most perennials require a period of dormancy, you can’t move them into a warm sunny window and treat them like houseplants (the exception here are geraniums). An unheated garage or shed is ideal, but a cool basement can also work. If you overwinter your perennials this way, you’ll need to water them whenever the soil gets completely dry.


Use a Sheltered Outdoor Spot


If you don’t have a suitable indoor spot, or if you have too many pots to find space for, another option is to move them to a sheltered outdoor location and cover them with mulch.


The best spot is on the north side of your house, garage, or shed. Lining up pots along a house (or heated garage) wall will provide them with some consistent warmth, while also blocking the sun on warmer days to minimize freeze/thaw cycles.


For extra protection, bury the pots in mulch–and at this time of year, it’s easy enough to find leaves for that job.


Wrap Them Up


While gardeners may wrap above-ground growth–like shrubs, hydrangeas, and rosebushes–in burlap over the winter, potted plants have a different issue. As explained earlier, it’s usually not the plant growth that needs protecting in a pot–it’s the roots. You can insulate and protect your roots by wrapping the pots in bubble wrap, burlap, or old sheets.


Bury Them, Pot and All


This is the most labor-intensive option, but it gives your plants the best chance of survival. And while it still involves some sort of planting, it doesn’t have to be as strategic as choosing a permanent place for the plant.


Depending on the number of plants you have, dig a hole or a trench in your garden or compost pile. The depth of the hole depends on how large your pots are. Ideally, the pots should be laid–or at least tilted–on their sides to prevent thawed moisture from accumulating on top. Once placed in the trench, the pots should be covered with mulch, or lightly covered up with soil. If you don’t have the space–or the time–to dig a big enough trench and need to leave the pots upright, bury only two-thirds of the container to improve drainage.


Potted plants do need a little bit of extra help to make it through the winter, but they’ll reward those efforts in the spring. What are your tried and true tricks for overwintering potted plants? Tell us in the comments below.


What advice would you add? Share it in the section below: 

Friday, December 15, 2017

In A Stateless World, Can You Grow Veggies In Your Front Yard?

Authored by Ryan McMaken via The Mises Institute,


The Miami Herald reports that a local couple is going all the way to the state supreme court to fight a local ordinance banning front-yard vegetable gardens: 


Hermine Ricketts and her husband Tom Carroll may grow fruit trees and flowers in the front yard of their Miami Shores house...


Vegetables, however, are not allowed.


Ricketts and Carroll thought they were gardeners when they grew tomatoes, beets, scallions, spinach, kale and multiple varieties of Asian cabbage. But according to a village ordinance that restricts edible plants to backyards only, they were actually criminals.


“That’s what government does – interferes in people’s lives,” Ricketts said. “We had that garden for 17 years. We ate fresh meals every day from that garden. Since the village stepped its big foot in it, they have ruined our garden and my health.”


These sorts of stories pop up several times a year. They are often discussed at free-market oriented and libertarian sites to illustrate just the myriad of ways that the state interferes in our daily lives. Many times, they intervene to prohibit totally innocuous activities like growing a front-yard garden. 


What articles like these often fail to point out of course, is that these laws didn"t appear out of nowhere. They are often passed because some voters demanded the city council or the county commission pass laws prohibiting front-yard gardens, or backyard chicken coops, or other non-violent activities deemed by some to be a nuisance to the neighborhood. These laws then persist over time because the majority of voters either agree with the laws, or don"t feel strongly enough about the matter to demand a change. 


In Miami Shores, the law against front-yard gardens was likely passed because at least a few people felt that front yard gardens were not so innocuous after all. 


This situation illustrates, yet again, a problem with majoritarian government. If a majority of the citizens of Miami Shores — or whatever jurisdiction — hate front-yard gardens, then they likely to vote for candidates who will vote to ban them. The minority, of course, is simply out of luck.


The implied solution in many of these free-market publications is that government should just get out of the business of regulating front yards. OK. But then people will begin to ask the inevitable questions: 


  • Should people be able to just dump garbage in their front yards then?

  • Can they park a food truck there 24-hours a day and sell hamburgers out of them? 

  • Can they put in their front yards a 20-foot sculpture of a jackalope

If the response is "of course not" then the next question is "why not?" or "so what is prohibited in front yards?" If a pile of old appliances is not acceptable in the front yard, why is a vegetable garden acceptable? What if many people think gardens are nearly as unsightly as an old car on blocks? 


You can probably figure out where this leads. We"re right back at regulating what people can do in their front yards. 


Indeed, when Ricketts laments that "government interferes in people"s lives" in response to the ban on her garden, one wonders if she"d be equally libertarian if her neighbors had piles of junk cars in their front yards. 


So, is there no solution here? Must we choose between bans on gardens on the one side, and piles of garbage on the other? 


The solution, of course, lies in decentralization and privatization. 


The Role of the Homeowners Association


Were local governments to totally abandon all regulations on neighborhood aesthetics, it"s easy to imagine what would happen next.1 Assuming, of course, that they were unable to convince local governments to ban allegedly "unsightly" features like front-yard gardens, those who hate the veggie gardens would then seek a solution in private homeowners associations.2


Those who want to be surrounded by neighbors who only plant nicely manicured lawns can have it — provided they find others willing to enter into a private agreement banning front-yard gardens. 


And this is exactly what many people do when they choose to move to covenant-controlled communities where they believe their "property values" will be protected by private agreements banning unsightly features to front yards or houses. 


People like to complain about their homeowners associations, of course, but there"s a reason they aren"t going away. The homeowner agreements don"t actually deter a large number of people from purchasing homes in those communities. Thus, the developers who sell houses there have little reason to believe consumers want a more laissez-faire neighborhood. Many residents actually like knowing that the local association won"t tolerate a weed-filled front yard or an old car up on blocks in the driveway. 


This is why the homeowners association became widespread in the first place: 


These developments were often more self-contained than the large-scale communities in that they maintained stricter standards regarding the appearance of the homes (both the structures and the landscaping). The general idea was that people who were looking for certain amenities (whether restrictions on pets or rules governing hedge planting) would be drawn to these communities; those who sought other amenities would look at other developments. 


Some homeowners association are more strict than others, but most are far more strict than the local municipal governments. Indeed, those who want front-yard gardens will probably find it easier to find a municipal government that tolerates them, than a private homeowners association. Finding a homeowners association that allows chicken coops is probably even harder. Many municipal governments, on the other hand, allow them


Decentralization Is the Key


A second option — decentralization — can achieve a similar result. 


Imagine, for instance, that Ricketts convinced a group of people on her side of town to form a secessionist neighborhood that was able to separate from the city of Miami Shores. It became West Miami Shores. 


The Ricketts and their neighbors would then get to have their front-yard gardens. This would also be good for the residents in Old Miami Shores. When potential new residents come looking around to buy a house in Old Miami Shores, the anti-garden people can simply say "you want a front-yard garden? Don"t move here, move over there."


Problem solved. 


Yes, it"s true that some residents in both areas will then have to move if they want to live in a neighborhood that favors their particular views on front-yard gardens. But at least now both groups have the option of getting what they want. 


In the absence of either of these options, we"re only left with a situation in which the majority can run untrammeled over a minority, and the minority has no escape.


Thursday, November 2, 2017

Everything You’ve Heard About Winter Gardening Is Wrong


It’s a gardening mantra we’ve heard our entire lives: Spring and summer are for gardening, fall is for harvesting, and winter is for dreaming about gardening. Right? Well, maybe not.


Author and horticultural expert Caleb Warnock gardens year-round – and he does it outdoors in the ice-cold state of Utah. In fact, he even grows beans, cantaloupes and tomatoes outdoors, and he doesn’t use a greenhouse.


Caleb – the author of “Backyard Winter Gardening” – is this week’s guest on Off The Grid Radio.


He shares with us tips on growing vegetables even in locations that get a foot of snow. Caleb also tells us:


  • The quickest and easiest way to get started in backyard winter gardening.

  • How to make a cold frame that will withstand the fiercest frigid temps.

  • What an all-natural hot bed is – and how it can revolutionize your winter garden.

  • How our ancestors grew vegetables during the winter.

If you’ve got a green thumb and want to try something new this year, then this show is for you!


Tuesday, October 17, 2017

Why Fall May Be The Best Time To Plant Your Onions

Why Fall May Be The Best Time To Plant Your Onions

Image source: Pixabay.com


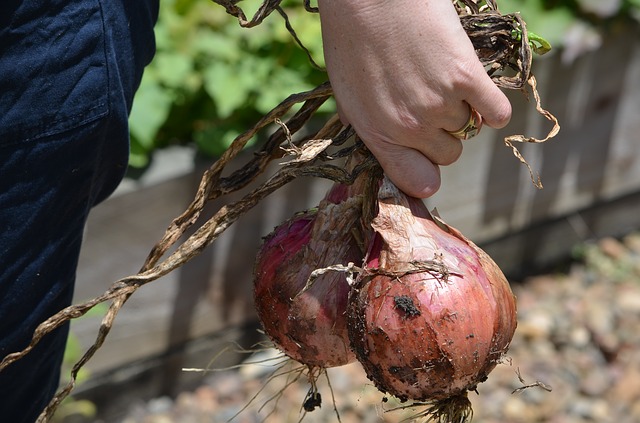
Onions may well have been among the first edible foods grown in domestic gardens, as the history of the domestic onion goes back thousands of years – seeds have been found in ancient Egyptian tombs — and they are still one of the most common vegetables found in modern kitchens.


Most people who grow their own onions plant them during spring, but did you know it is possible to get a head start on your harvest by planting in the fall, as well? There are several advantages of planting in the fall. First, it is a time when there a fewer garden chores that need done. Also, onions that have been planted this time of year are often more productive and reliable than their spring counterparts. They are less vulnerable to common pests that enjoy munching on them.


Like their garlic cousins, onions can be very hardy and cold tolerant. You simply have to keep a few things in mind if you choose to plant them during autumn.


Planting Your Onions


Fall onions tend to do well if planted between early September to late October (provided the ground is not frozen). It often works well to plant them following the harvest of a summer crop such as potatoes, as you already have ground that has been dug.


While it is possible to grow onions from seed, it is much more common (and easier!) for backyard gardeners to grow them from sets or immature bulbs. Over winter, these sets have the opportunity to establish a healthy root system before their green shoots emerge in the spring.


Looking For Onions For Your Garden? Get Them From A Family-Owned Company You Can Trust!


Choose a relatively weed-free area that gets full sun and that has firm, well-draining soil. To avoid possible disease, do not plant onions where you have grown other onions, carrots, beetroot or garlic during the previous season.


Sets of onions should be planted about one-inch deep, allowing the tip of the bulblet to slightly poke above ground level. If the tips are on the long side, you can trim them down to the shoulder of the bulb first. Space your onions 3-4 inches apart.


Caring for Onions


Why Fall May Be The Best Time To Plant Your Onions

Image source: Pixabay.com


One of the nice things about planting onions during the fall is that they don’t really require a great deal of care. Your sets will only grow for a few weeks before the colder temperatures send them into a kind of semi-hibernation mode.


Still, you need to ensure that the area in which they are planted has few weeds and that they do not get waterlogged.


Sets of onions may be watered once after they’ve been planted, and after that normal fall rain should be enough to give them the water that they need. If you live in an area that gets excessive fall rain, you may not find it worth it to plant during autumn.


Varieties to Plant


Planting onions during fall is not something that can be done with every variety. Many types simply will not survive freezing temperatures, so you have to choose carefully. For gardeners in zone 6 or colder, you should cover your plants with straw or mulch and use plastic sheeting or tunnels to help them survive the winter.


Among the best varieties of onions to plant during fall are:


  1. Senshyu yellow – this cold hardy onion produces a semi-flat, average-sized bulb with yellow skin.

  2. Radar – this type of onion has light-brown skin and boasts a mild to medium flavor. This type of onion also stores better than many other varieties of onion when harvested during June.

  3. Electric – a red-skinned onion that has red and white flesh. This variety has a medium to strong flavor and can be stored for up to four weeks.

  4. Valencia – these onions have a golden to brown skin and a mild, somewhat sweet flavor. They tend to do well in almost any region.

  5. Talon F1 – these form hard, uniformly shaped bulbs with golden brown skin and white flesh.

  6. Red baron – a very pretty variety that has deep red skin. The flesh is mostly white, but has red to purple inner rings.

  7. Evergreen hardy bunching onion – one of the most cold-tolerant varieties! Can be overwintered in even northern regions such as Vermont. Grows in dense, green clumps.

  8. Bandit leeks – produces nice blue-green flags and a thick white base with very little bulbing.

Your Spring Harvest


Overwintered onions are generally producing bulbs by May and reach their full size by June. Harvest your onions before or shortly after you see a scape appear.


These onions will not last in storage as long as other onions, so it is best to use them fresh — in the same way you would use scallions.


Do you have any fall-planting tips for onions? Share your tips in the section below:

Sunday, October 8, 2017

6 Life-Saving Uses For An Ordinary Glass Bottle (Don’t Miss The Video For No. 3!)

6 Life-Saving Uses For An Ordinary Glass Bottle (Don’t Miss The Video For No. 3!)

Image source: Pixabay.com


It can be frustrating to see litter and trash lying on streets and in fields, but for the savvy survivalist, some trash can turn into life-saving tools.


One such item that is commonly thrown away but can be re-purposed into a variety of different survival uses is the glass bottle.


Here are seven survival uses for an ordinary glass bottle:


1. Make a glass blade.


A glass bottle can be easily re-purposed as a tool or weapon, and specifically as a glass blade. We’re talking about everything from knives to arrowheads to spear points to practically any kind of razor-sharp instrument that you can think of. Just be careful not to cut yourself when breaking the bottle into the shape you need.


2. Boiling water.


In any kind of survival situation, you will always have to boil or purify water before you drink it. Drinking water that has been contaminated in any way whatsoever can sometimes be more dangerous than not drinking any water at all.


Ultra-Compact Water Filter Fits In Your POCKET !


Simply fill the bottle up from the nearest river or lake that you find, and then suspend it over a fire with some sort of cord. The water will begin to boil in just a matter of minutes, and any harmful bacteria or pathogens inside of it will be eliminated.


3. Starting a fire.


On a day where you have plenty of sun, fill up your glass bottle with clear water. Then, position that bottle in between the sun and whatever you’re using as tinder; charred cloth works best for this method. The sun will shine through the bottle and onto the tinder. Hold the bottle steady and roughly an inch or two above the tinder. (It requires patience.) Once the smoke starts to appear, gently blow on it to create an ember that can then catch flame.


Story continues below video:


4. Transporting water.


Make sure that you have a cork or some sort of cloth to wrap around the top as a lid. If you’re electing to stockpile your water, then do so in a cool and dry location; storing water under the sun or in a hot room greatly increases the likelihood of harmful bacteria or pathogens developing in it.


Portable Device Restores Your Old Blades To A Razor’s Edge In Just Seconds!


5. As a container.


You don’t just have to use your glass bottles to store water. You can also use them to keep water out. Store anything in your glass bottles that you need to keep dry, such as sugar, salt, cloth and medications.


6. As a portable torch.


Beyond using your glass bottle to get a fire going, you can also use it to maintain a fire, as well, specifically in the form of a torch. Clean up your water bottle from the inside-out, and make sure that you have a wick and some torch fluid on standby. Fill the bottom part of the bottle with water underneath the wick, and then the rest of the bottle with the torch fluid.


Pour a little bit of the fluid over the wick and then place it into the bottle. Light the wick and you have a torch.


What survival uses would you add? Share your tips in the section below:  


Harness The Power Of Nature’s Most Remarkable Healer: Vinegar

Thursday, September 28, 2017

The Crazy, Lazy Gardener’s ‘Fall Trick’ That Will Eliminate Spring Weeds

The Clever, Lazy Gardener

Image source: BackyardBountyFarming.blogspot.com


For many gardeners, growing a bounty of fresh fruit and vegetables for their family and friends to enjoy is a labor of love – but nevertheless still a labor. And when other activities and responsibilities start to mount up, it can be easy to let the garden suffer.


Wouldn’t it be great if there were a way to make gardening easier, with less work and perhaps an even greater bounty? If this sounds like fiction or wishful thinking to you, you may not have heard of lasagna gardening. But to do it right and reap the rewards come spring, you need to start on it during the fall.


When we talk about lasagna gardening (also known as sheet mulching or sheet composting), we are not talking about planting tomatoes, eggplant and zucchini – ingredients of lasagna (although you may certainly plant these and other vegetables in your lasagna garden). We are talking about a style of composting that can result in beautiful black soil, without tilling, very few weeds, and less need for fertilizer.


How to Start


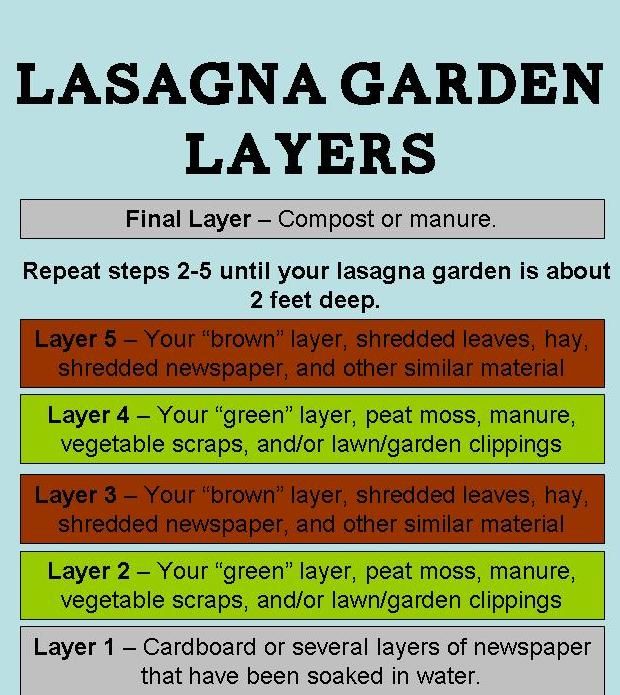
Starting a lasagna garden is very easy. In fact, it doesn’t even require the use of a shovel or the removal of existing weeds. Start with some simple brown corrugated cardboard or some newspaper (use three layers if you decide to go with newspaper) and lay them down right on top of the area that you’ve selected for your garden – right over the top of grass and weeds!


Looking For Non-GMO Seeds? Get Them From A Company You Can Trust!


Keep this layer moist so that it provides a nice cover that earthworms will be attracted to; that will allow them shelter to loosen up the earth below.


Just like the kind of lasagna that you eat, a lasagna garden consists of multiple layers. In the case of a garden, the layers consist of alternating between brown and green compost. Brown compost can be made up of items such as cardboard, shredded newspaper and dead leaves. Green compost may be items such as fruit and vegetable scraps, trimmings from the garden, etc.


As a general rule, you should make your brown layers about double the thickness of your green layers. Doing this by sight is fine, though, – there is no need to break out the tape measure. Keep building your layers until they reach about two-feet tall. This may sound like a lot, but remember that this is going to shrink down considerably over the next few weeks.


When to Start


You can start the process of building your lasagna garden any time of year, but fall is the most ideal time. This is for a number of reasons:


  • There is an abundance of dead leaves and other “brown” compost material available during the fall.

  • Autumn rain and winter snow will help to keep your garden materials moist, allowing rich workable soil to develop.

  • Your garden will be ready for planting by spring.

Lasagna Gardening: The Clever, Lazy ‘Fall Trick’ That Will Eliminate Spring WeedsPlanting in your lasagna garden is easy and quite similar to planting in a traditional garden. Just dig down with your spade or shovel as you normally would. If you used cardboard for your first layer, you may have to cut through it, but you should find nice workable soil underneath. If you used newspaper as your first layers, you’ll likely dig right through it without even noticing.


This New All-Natural Fertilizer Doubles Garden Production!


Plant whatever you like. Just be sure to follow the normal guidelines for each fruit and vegetable that you introduce to your garden.


It is also a good idea to add mulch to this garden once it is complete. This may be in the form of chopped leaves, straw, bark mulch, etc.


From that point on, you’ll care for your lasagna garden much like you would any other garden by watering, weeding, rotating crops and finally enjoying bountiful harvests at the end of the season.


Lasagna gardening has many advantages over traditional gardening, including:


  • Less weeds. Because of the newspaper or cardboard layer at the bottom, fewer weeds will be able to make their way to the surface.

  • Improved water retention. The layers of compost will be better at retaining water than plain garden soil. This is a great way to give new plants a strong and healthy start in your garden.

  • Nutrient-rich soil. Again, because of the layers of compost, your garden’s soil will be rich in nutrients. This means that there will be less need for fertilization.

  • Easy-to-work soil. Lasagna gardening results in soil that is soft and workable. This eliminates the need for tilling.

If you love gardening but are looking for a way to reduce your workload next season, then lasagna gardening may be just the answer you’ve been looking for. Why not give it a try this fall and see how much less work your garden can be next year?


What advice would you add for lasagna gardening? Share your tips in the section below:


Bust Inflation With A Low-Cost, High-Production Garden. Read More Here.