Showing posts with label Survival Gardening. Show all posts

Tuesday, May 8, 2018

7 Must-Have Herb Plants to Give You a Bug-Free Backyard

After a long spring, there’s nothing better than enjoying the outdoors.  We can’t wait to get outside to do yard work, ride bikes, garden, grill out or to enjoy Smores around a campfire.  However, it’s not long before the pesky bugs arrive to drive us all crazy!


How often have you and your family wanted to eat outside but you all go back inside because of the bugs?  Swatting away bugs and getting bitten can ruin a perfect summer night!  Our quick fix is to pull out the bottles of bug spray.  But not only does using bug spray get expensive but who wants to spray DEET on themselves and their kids intentionally?


Here’s the good news.  We don’t have to hide inside to avoid these annoying bugs.  There are natural ways to combat them instead.  So this summer, try a natural way to have a bug-free backyard this year with these seven must-have plants!


  1. Catnip:  Need a long-term stink bug repellent?  Catnip is the herb of choice!  Also repels ants, cockroaches, and squash beetles.


  1. Rosemary:  A great herb to have around to repel mosquitoes.  Plant in pots to decorate your outdoor living areas.   In addition to repelling bugs, you can use rosemary to enhance your meat dishes, add to homemade bread or to garnish a plate!


  1. Chives:  Chives is a perennial that will not only provide you with a beautiful border and endless kitchen possibilities but will keep the mites, aphids, and beetles away too! 


  1. Lavender:  Though lavender is a favored scent to freshen up our homes, bugs such as fleas, mosquitoes, and flies hate it!  Lavender is a perennial, providing you with beautiful bluish-purple flowers year after year.  Not only will you keep the unwanted bugs away but you can dry your lavender bouquets to keep around the house.


  1. Basil:  Plant in pots around your deck or favorite area to spend as a family.  Basil repels two annoying pests, mosquitoes and flies.  Another benefit of having basil around is you can use it to spruce up your culinary dishes as well!


  1. Mint:  Another great mosquito repelling herb to grow in pots.  Plus, while enjoying a bug-free patio, you can pick a few mint leaves and use them to freshen up a guests tea or Mojito.


  1. Lemon Balm:  Not only does lemon balm keep biting insects away but snakes as well!  Another herb that can be planted in pots and placed around the areas that you hang out the most.  As with most herbs, you can add it to your culinary dishes or enjoy in a cup of tea.


Don’t let the bugs deter you from enjoying summer with your family.  If you are new to gardening, start small.  Buy a few pots, potting mix and herbs at your local greenhouse.  Get the kids involved too!


The post 7 Must-Have Herb Plants to Give You a Bug-Free Backyard appeared first on Off The Grid News.

Wednesday, May 2, 2018

5 Gardening Myths That Seemingly Everyone Believes

5 Gardening Myths That Seemingly Everyone Believes (No. 2 Shocked Us)

Image source: Pixabay.com


We have all grown in our gardening experiences by words of wisdom from those gardeners who have come and gone before us, and we’ve even followed gardeners who have TV shows, blogs and websites dedicated to their art.


Of course, there’s a lot of advice that we’ve accepted that is nothing more than myth. This is not to say the advice is not entirely false, but it is not entirely true, either.


These myths have been around so long that even some of the experts take them to heart.


1. All organic pesticides and sprays are safe. Although it’s common sense to question how safe a pesticide is, many gardeners take organic pesticides for granted. Most of the time it is safe, but there are some natural ingredients that are just as dangerous, or more so, than commercial chemicals.


Need Non-GMO Seeds For Your Organic Garden? The Best Deals Are Right Here!


Sulphur, for example, was used by early gardeners, but it can be deadly. The same goes for warfarin, sabadilla, rotenone and nicotine, even though they are plant-based. Even pyrethrin, when used long enough, can harm you and your garden. When looking for natural alternatives, be sure to investigate their safety.


2. Fresh vegetables are far more nutritious than frozen or canned vegetables. Well, how fresh is fresh? It is true that fresh vegetables are healthier for you, but only when they are freshly picked. The vegetables you purchase in the grocery stores usually make quite the trip from the field to the shelves of the store. Sometimes the journey takes several days or even weeks to get to the final destination. Enzymes are naturally being released by the vegetables during storage and shipping, causing the vegetables to lose nutrients and minerals. However, when the produce is fresh-picked and quick-frozen, most of the vitamins, minerals and other nutrients are preserved. This is good to keep in mind for your own garden produce: If you’re not planning on eating your harvest within a short time, don’t delay in preserving it.


5 Gardening Myths That Seemingly Everyone Believes (No. 2 Shocked Us)

Image source: Pixabay.com


3. Kitchen scraps are all you need for compost. How many of us have compost bins by our gardens, and walk our kitchen scraps out there after each meal? Yet kitchen waste, if that’s all you’re using, is too strong for your garden. You need a mix of leaves (known as brown) and kitchen waste (known as green). There needs to be the correct balance between the two, meaning having more brown than green. The breakdown of these two things creates compost. You can always put extra kitchen scraps into a worm box, or vermicomposter.


4. Watering vegetable plants in the sun will kill them. How often have we been told this one? It’s definitely one believed by many experts. The most common reason gardeners accept this myth is on the premise that the water acts as a magnifying glass. The sun’s rays will hit the water and they will burn the vegetable plants, especially the leaves.


Seamazing: The Low-Cost Way To Re-mineralize Your Soil


The truth is the water isn’t strong enough to magnify the sunlight enough to the required heat needed to burn the leaves and plants. Now, this doesn’t mean high noon is the perfect time to water your garden. Be reasonable.


5. Organic gardens are more expensive than traditional gardens. This myth has become more common as people are starting to want more and more organic products and food. Organic produce from any grocery store is more expensive — it’s true. Growing your own organic vegetables are not, however. When you cut out any commercial fertilizers and pesticides, you are saving money. By making your own mulch and compost from scraps and leaves from your yard, you will be saving even more money. Re-use containers and use mixtures of hot soapy water, garlic and hot pepper to keep away unwanted pests. Dead leaves can be used, along with lawn cuttings and scraps, to make fertilizer. Save seeds from your current produce to use for next season. Dry the seeds out and store them in a cool, dry place away from the sun. This is a great way to have a successful garden, as the healthy plants have healthy seeds.


The best way to garden is to do your research and speak to experts and fellow gardeners alike. The more you know, the better your garden will be. You will be able to decide what is true and what isn’t, and your garden will thank you.


What myths would you add to this list? Share your myths in the section below:


Every Spring, Gardeners Make This Avoidable Mistake — But You Don’t Have To. Read More Here.


The post 5 Gardening Myths That Seemingly Everyone Believes appeared first on Off The Grid News.

Monday, April 30, 2018

8 Fun Facts About Potatoes

We don’t always have to look that far to find interesting stuff.  In fact, sometimes it turns out that it’s been right there in our everyday lives all along.  To wit: the humble potato


Here are eight facts about potatoes—some are well-known, and others less familiar. 


1.       Potatoes have been said to provide almost complete nutrition.  I have no plans to try living on potatoes alone and certainly do not recommend it for anyone else.  But it has been done.  People throughout history have thrived for long periods of time on a diet of mostly potatoes, or potatoes and milk, and the potato is still considered a staple in many cultures.  Potatoes can comprise a significant portion of a healthy diet, being high in vitamins C and B6, potassium, and manganese, and providing a modest percentage of daily requirements for protein, thiamin, niacin, and folate.[1]


2.       They are excellent keepers.  Most homesteaders—and even folks who do not grow much of their food—are likely to know this one. Adequately cured for several days in moderate temperatures and humidity, and stored in a cold dark, well-ventilated storage cellar, potatoes can keep from one growing season to the next.


3.       Potatoes are easily grown in almost any climate.   They thrive in places as far-flung as Idaho to China to South Africa to Mexico, in temperatures from cold to temperate to sub-tropical.  Potatoes can be a bit picky about soil composition, particularly acidity, but the soil can easily be amended to their liking.


4.       Potatoes originated in South America.  They were introduced to Europe by way of the Canary Islands from the Spanish explorer Francisco Pizarro in the early 1500’s, one of the few specimens to survive the arduous intercontinental voyage in primitive conditions, and were quick to take root in the Old World.[2]


5.       Entire cultures have risen and fallen because of potatoes.  Most people have heard of a connection between potatoes and Irish people in history, but not everyone understands quite how consequential it was.  It was the easy-to-grow and nutritious potato which allowed the peasants of Ireland to prosper on little land and few other resources.  Between the time it was first introduced to Europe in the 16th century until late blight hit the island in the mid-1800’s, the potato came to be the single most important food in Ireland.  But because it was so crucial to people’s very survival, when late blight destroyed the potato harvests, it decimated the population which depended upon potatoes for survival.[3]


6.       Potatoes are clones.  Just to clarify how that’s noteworthy, here’s a quick refresher on the birds and the bees.  Most higher organisms—that is to say, plants and animals—reproduce sexually.  That means that DNA from each of two parents combine to create a new and completely unique organism.  Not so with cloning, which instead is an exact replication of a single parent organism.   When we plant potatoes, we don’t use seeds, which are the result of sexual reproduction.  Instead, we use chunks of potato, which has the same DNA as the one used to plant it. 


7.       The world’s supply of potatoes is potentially at significant risk.  The reasons are multifold.  Two points which contribute to this risk have already been mentioned:  the history of a single plant disease having wiped out nearly every potato in Ireland, and the fact that almost all potatoes grown today are clones. 


Additionally, commercial potato producers grow only a fraction of the original varieties, which minimizes the gene pool and makes them that much more vulnerable to a pandemic.  But perhaps one of the most important and most overlooked factors is this:  because potatoes are being grown in an increasing number of ecosystems to which they are not indigenous, they lack the advantage of being cross-bred with wild relatives that can provide genetic defenses.  These factors combine to create a precarious existence for potatoes in our diets.[4]   


8.       It was the first vegetable, and entirely possibly the only one ever turned into a popular kids’ toy.  That’s right; I’m talking about Mr. Potato Head!  People of a certain age—ahem—might even remember the fact that the original version included only accessories, which kids attached to real potatoes.  This might sound a little unappealing to modern sensibilities, which probably indicates that in the sixty-some years since Mr. Potato Head arrived on toy store shelves, there have been almost as many changes in cultural norms as in the potato itself.


Potatoes indeed represent an essential component in the diets of myriad cultures, both in contemporary times and throughout history, providing solid nutrition that is easy to reproduce and stores well.  But there are far more potato varieties in existence than many of us embrace or even know about, which not only limits our eating and growing experiences but could prove to be the potato’s undoing.


[1] http://nutritiondata.self.com/facts/vegetables-and-vegetable-products/2770/2


[2] Dunn, Rob. Never Out of Season: How Having the Food We Want When We Want It Threatens Our Food Supply and Our Future. New York, Boston, London: Little Brown, and Company, 2017.


[3] Pollan, Michael.  The Botany of Desire: A Plant’s-eye View of the World.  New York: Random House, Inc., 2001.


[4] Dunn, Rob. Never Out of Season: How Having the Food We Want When We Want It Threatens Our Food Supply and Our Future. New York, Boston, London: Little Brown, and Company, 2017.


The post 8 Fun Facts About Potatoes appeared first on Off The Grid News.

Thursday, April 26, 2018

More Vegetables In Less Space With “3-D Gardening”

     Vertical gardening is perfect when space is an issue.


Spring is in the air, and that means gardening at our house. Like many folks out there, gardening is part of our annual ritual. Also, like many folks, we enjoy raising our food and believe there are many health benefits in doing so. Even though we try to grow as much food as we can, our annual production never seems to be as high as we’d like. We always ask the question, “How can we grow more?” One approach we are taking this year to boost our harvest is to incorporate more vertical gardening.


Vertical gardening has become a favorite growing method as many people face the same dilemma that my family and I do. We all have limited space and want maximum return. Although you can’t necessarily have it both ways, you can increase your production by getting creative with your space. Vertical gardening is a creative way to create more space in your backyard, community garden, or even a patio. Take a small 10’x10’ patio for example.


If you only used the 10’x10’ patio for growing, you would have 100 square feet of space to work. Not much. If you use vertical gardening, however, you use the square footage above the patio as well. For example, if you used the space eight feet above your patio, that could transform your small patio into a decent garden. By doing so, you would potentially create an additional 700 square feet of space to grow food. Essentially, vertical gardening is looking at your garden as a 3-dimensional ecosystem, rather than as a 2-dimensional piece of flat earth. Vertical gardening opens up a world of possibilities.


Although there are many ways to achieve a vertical garden, you can start by selecting crops that are best suited for vertical growth. If the idea of growing more food in a small space sounds intriguing, you might look at these five crops that excel in vertical gardening.


Pole Beans


Of course, pole beans are the first crop any vertical gardener has to consider. The upward reaching vines have been used for centuries to climb up other plants. They are one of the famed vegetables in the three sisters gardening philosophy. Beans, of course, don’t need to grow up corn stalks to utilize space. Many folks use a variety of structures to grow pole beans upon. If you get creative, you can use fences, lattice, cattle panels, or even upside-down tomato cages. All they need is a frame of some kind to grow on. If you are looking to use vertical space, pole beans should be one of your very first choices.


Strawberries


While planning our vertical garden, we were surprised to learn how many people are using vertical space to grow strawberries. Although you might think this ground covering plant wouldn’t be ideal for hanging in the air, you’d be surprised to learn otherwise. People use all sorts of bags, crates, and other containers to grow strawberries exceptionally well. One popular method is to build a milk crate tower for strawberries. Even if you only plant on three sides, an average milk crate offers over 500 inches of growing space. When stacking these crates, the sky is the limit regarding how much space you want to create.


Watermelon


Since we were surprised to learn how well strawberries grew vertically, we were skeptical that we could produce watermelons in the same fashion. It didn’t make sense that you could have substantial melons suspended in the air. Little did we know that watermelons can conveniently be grown vertically as well. As long as they are given adequate support and trained, this ground blanketing crop will crawl up sturdy support. This method helps to overcome one of the biggest downfalls of watermelon. Usually, watermelons take up too much space for a person with a small garden. You just can’t devote the required area to a plant that won’t produce that much food. Grown vertically, though, you might be able to justify having some of these tasty melons in your small garden.


Cucumbers


The cucumber is another crop that people are successfully experimenting with in vertical gardening. Cucumbers have the same downfall that watermelons have, in that they take up a great deal of ground space. However, like a watermelon, if you give adequate support to a cucumber, it will also grow up into space. Many folks who are growing cucumbers vertically do seem to be spending more time training this crop to develop upwards. If you have a panel or fence, just tie it off at a few points, and the plant will reach up and up, saving you space on the ground.


Tomatoes


The final member of this list of vertical gardening crops is a tomato. Tomatoes have been a favorite crop to grow vertically for years now. In order to meet the needs of gardeners, companies have been cranking out a variety of hanging bags to grow tomatoes in. You can watch this corny infomercial featuring a hanging tomato bag to see the basic idea. Although the infomercial is pretty cliché, it does highlight the fact that tomatoes can be grown vertically to create more growing space.


Let’s face it, most of us wish we had more space to grow things. In reality, though, a more extensive growing area is not always an option. We have to get creative with our approach if we want to maximize our harvest. One way to get creative is through vertical gardening. Personally, my family has already made plans to vertically incorporate several of these crops into our garden this year. We’ve had to think creatively about our property, what we want to grow, and what is a good fit for us. By doing so, we hope to maximize our space and get more produce this year. Vertical gardening can cost a little more if you have to buy supplies. Over time though, those costs should dissipate. In the end, if you believe that growing your crops is the healthiest and best way to eat, the gain is worth the price. As spring marches onwards, take the time to see if any of these vertically-growing crops can help your garden produce more.


Tuesday, April 24, 2018

This Survival “Super Plant” Belongs In Every 2018 Self-Reliance Garden

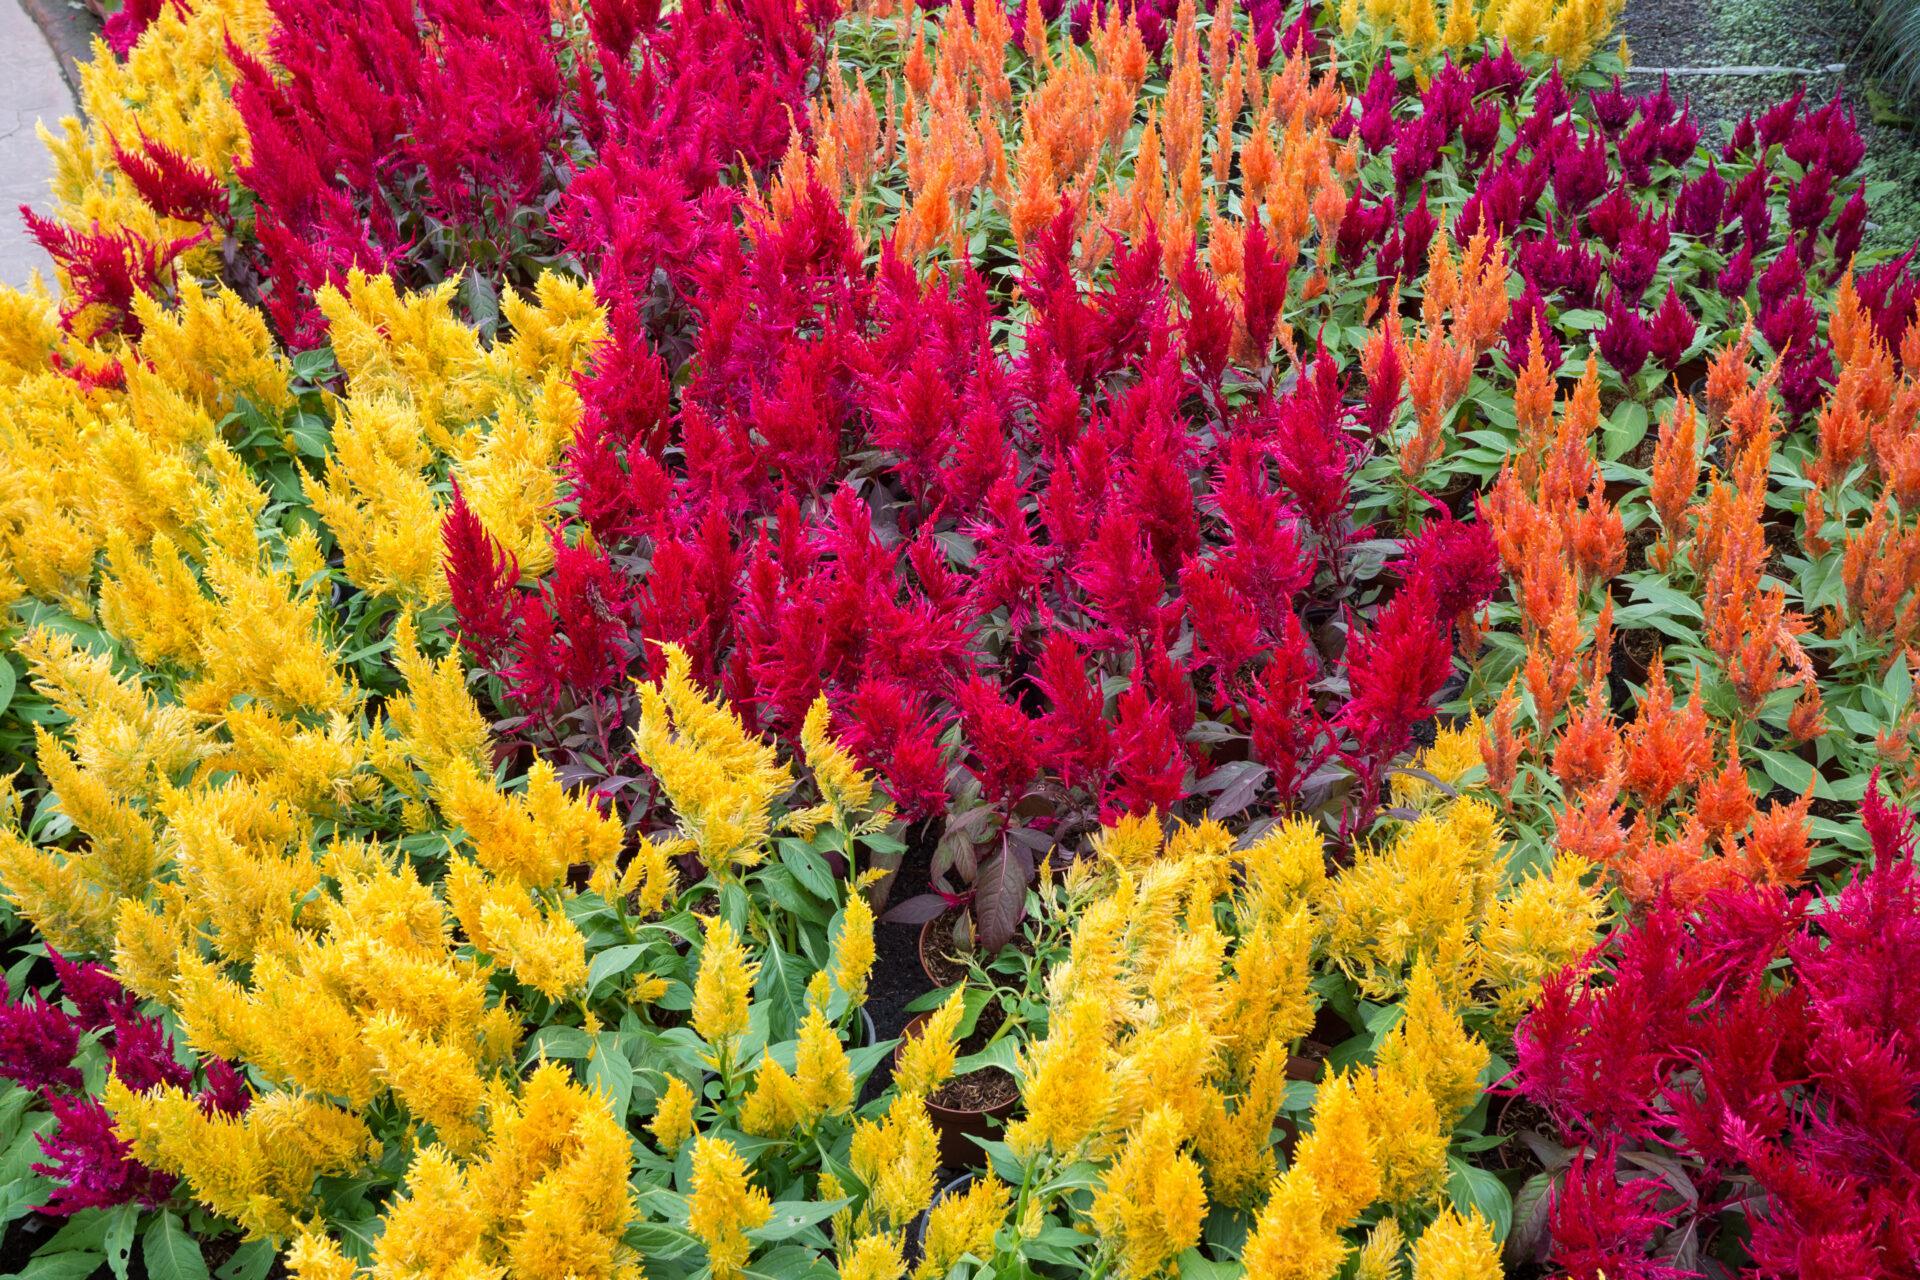
Crested, plume, or spike varieties of celosia flowers can be a stunning addition to your garden.


Whether they’re of the crested, plume, or spike types, celosia flowers are quite striking. All are vividly colored, but crested celosia, with its unique shape, has given the flowers their common name: cockscomb. Crested celosia flowers are wavy and fan-like and, when they form into a globe shape, they resemble a brain. When they develop flatter and narrower, the flowers look like a rooster’s (or cock’s) comb.


Although no one is sure where celosia originated, it’s a tropical plant that grows widely throughout Africa, Indonesia, and Asia. It was introduced into England in 1570 and by the early 1700s, it was noted growing in Carolina.


Both George Washington and Thomas Jefferson grew cockscomb at their estates. By the middle of the 19th century, it was “almost universally grown” in America’s flower gardens. In the 1920s and ‘30s, cockscomb was often included in agricultural exhibitions at county and state fairs, with gardeners competing to see who could grow the biggest crest on the smallest plant.


As a member of the amaranth family, common cockscomb is edible. While most American gardeners grow cockscomb as an ornamental plant only, it is collected from the wild as a food source in Asia, South America, Africa, and the West Indies. Like other leafy greens, cockscomb is a good source of protein and also provides vitamin A, vitamin C, iron, calcium, and phosphorus.


All parts of the plant are edible, including the stem, leaves, and flower. That said, the stem and leaves are more tender before the plant starts to bloom. Young leaves are similar to basil in texture, comparable to spinach in flavor and can be used in place of spinach in cooked recipes. In cultures where cockscomb is eaten, its leaves are usually added to soups and stews. However, in Mexico, the leaves are served as a side dish after being cooked with hot peppers, red palm, garlic, and lime. Cockscomb stems can be chopped up and added to stir-fries, and the flowers work beautifully as a garnish.


Cockscomb is also highly regarded for its medicinal properties. Anecdotally, it’s used to treat a wide variety of issues including diarrhea, gastroenteritis, and dysentery. It’s used in Asia, in particular, as a parasiticide for tapeworms and other parasites. Additionally, the leaves are pounded and applied as a poultice for various types of skin sores and wounds. Notwithstanding, please consult a medical professional if you’re considering using cockscomb to treat a medical issue.


Celosia is a worthwhile addition to any garden, and it’s readily available as a bedding plant at most garden centers in the spring. It can also be grown from seed, though it’s best started indoors about 6-8 weeks before the last frost. Since it doesn’t like its roots disturbed, it’s best to start seeds in peat pots or other compostable pots that can be directly planted into the garden after the last risk of frost. Celosia is incredibly easy to grow, as long it’s planted in full sun with well-drained soil. It’s prone to root rot if its roots stay wet too long but otherwise requires little care, being drought-tolerant and immune to most pests and diseases. Best of all, celosia does well as an annual almost everywhere, beginning in hardiness Zone 2. In Zones 10 and above, it should overwinter nicely.


Well, what are you waiting for? With so many stunning varieties and colors, not to mention “off-the-grid” uses, why not start planting your own celosia varieties for 2018?


10 Great Cold-Hardy Vegetables

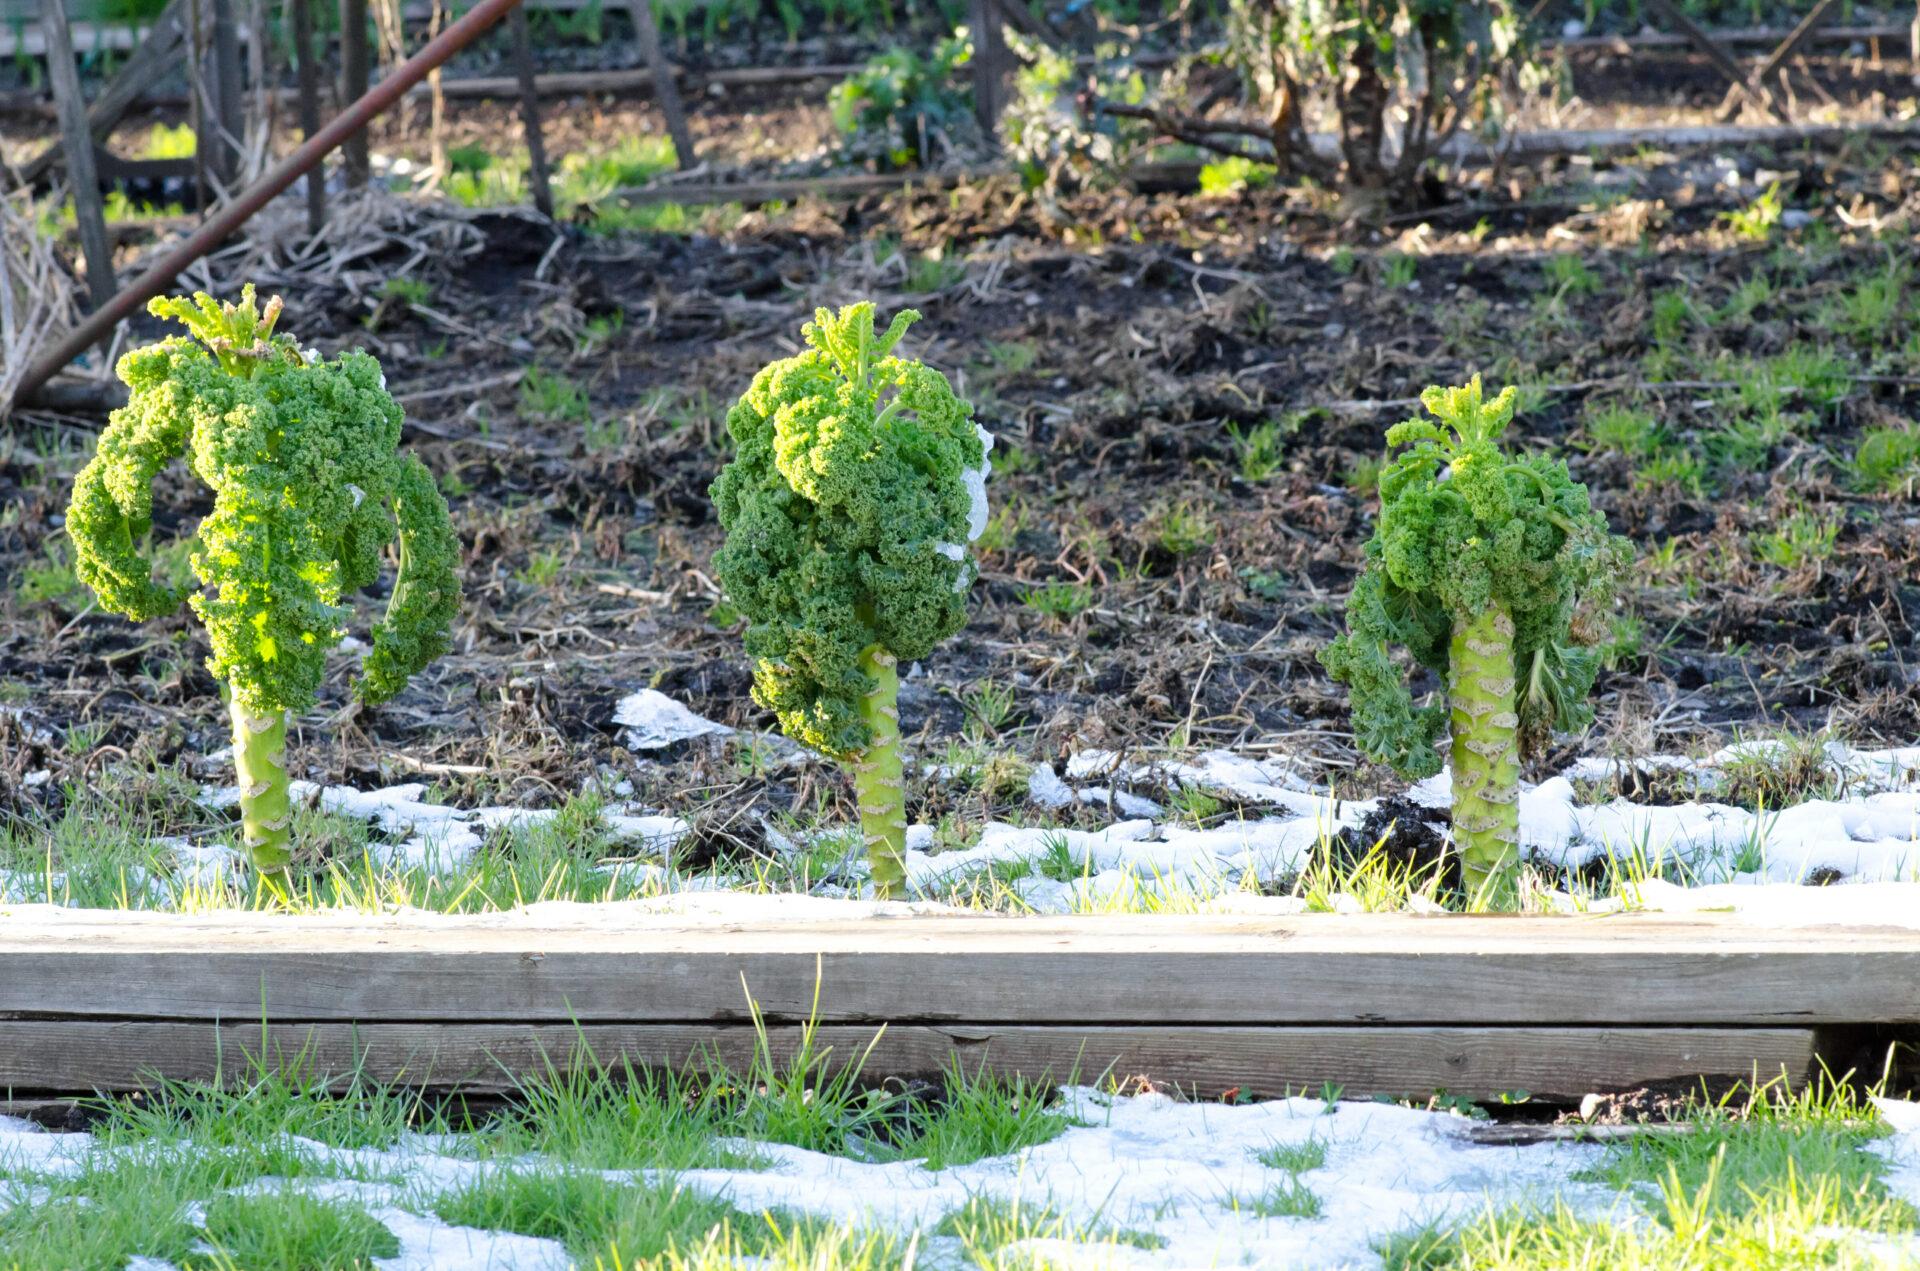
The coldest winter in 150 years for many gardeners has keep the focus on cold-hardy vegetable varieties until warmer weather arrives.


There are many ways to extend the growing season through the winter in cold temperate climates, including using cold frames, greenhouses, row covers, and raised beds, as well as mulching heavily and starting plants indoors. Perhaps one of the easiest ways to extend the season, however, is to grow a diversity of cold-hardy plants. Cold-hardy plants can allow you to begin harvests earlier in the spring while continuing to yield later into the fall and even through winter.  Below is a sampling of some favorites, as well as some lesser-known cold-hardy vegetables.


Kale And Collards (Brassica Oleracea Acephala)


Certain varieties of kale, such as Red Russian, and Sea Kale may produce well into the winter, especially if protected by cold frames or other covers.  Some may even survive the winter in areas as cold as zone 5, such as the perennial Sea Kale (Crambe maritima). This type of Kale is actually outside of the Brassica oleracea species of plants which includes other vegetables like kale, collards, cabbage, broccoli, and brussels sprouts. Mulch heavily and kale will stick around longer into the cold season, as with most plants.


Swiss Chard (Beta Vulgaris Cicla)


Although a heavy frost will kill chard, they will still produce well into the late fall in colder climates, and if covered, they may even last into the winter.  On very rare occasions, swiss chard can make it all the way through, even in zone 5 or warmer.


Beets (Beta Vulgaris Conditiva)


Even after the beet greens die off above ground, you will still be able to harvest the beet itself, often well into the winter. Beets are related to chard and their greens are equally as delicious.


Cabbage (Brassica Oleracea Capitata)


Cabbage comes in many different varieties and is another excellent green that will last into the depths of the fall at least. There are even perennial varieties such as Walking Stick Cabbage, although they don’t have the large cabbage head that is characteristic of more popular types of annual cabbage.


Good King Henry (Chenopodium Bonus-Henricus)


This spinach relative is another perennial green that lasts into the fall in even the coldest climates, and it will also emerge early in the spring. Mulch heavily and it should survive in as cold as zone 4 climates. The cooked young leaves are best and must be eaten soon after harvest since they wilt. The seeds can also be eaten once soaked in water overnight and rinsed, though they are a little small and time-consuming to harvest.


Perennial Onions (Allium Species)


There are a few varieties of perennial onions that last well into the fall in the coldest of climates, including Egyptian Walking Onion and Perennial Bunching Onion. These plants are commonly grown for their onion greens, but the bulbs can also be eaten, of course, although they are smaller than their annual cousins. The bulbs may be harvested throughout the year, even when the aboveground greens die back.


Musk Mallow (Malva Moschata)


Musk Mallow is another perennial green that produces late into the year and comes up relatively early in the spring. The young leaves have a mild flavor and are best as one component of a multi-green salad. There are other varieties of mallow that are perennial as well, but this one is known to be one of the best flavored. The flowers and seeds are also edible, and the plant is hardy to at least zone 3.


Sunroot (Helianthus Tuberosus).


A vigorous perennial root crop growing to 10 feet tall, the flavor of the tuber improves after frost. Some say they are best eaten in their first year, though they will continue to produce and spread as a perennial for many years. Care should be taken to cook them well, and they shouldn’t be eaten in large quantity at first since they may cause gas. They are similar to beans in this way until your body grows accustomed to them.


Radicchio / Italian Chicory (Cichorium Intybus)


These perennials have edible leaves and roots. The leaves are a little bitter and are often blanched by excluding light while they are growing, making a sweeter, milder flavored green. Cook the roots like you would parsnips.  The roots also make an excellent (caffeine-free) coffee substitute when roasted and powdered.


Perennial Yam (Dioscorea Batatas)


Grown commonly in Japan and other parts of Asia as food, this vine root crop cultivates well in cold, temperate regions and can be harvested well into the winter, or early in the spring (until the ground freezes or when it thaws). It is hardy to at least zone 5 if mulched heavily and can grow up to 8 feet long or more. It is best grown in deep, sandy soil, where it will produce a much larger root than in more dense soils (up to 3 feet long!). Cook the yam before eating, either by baking or boiling, similar to a regular yam. It is not very flavorful but is an excellent addition to soups and will readily absorb added flavors. The vine also produces small “aerial tubers” which are little yam berries. These tubers can also be cooked and eaten or used to propagate more plants.


These are but a small sampling of the many cold-hardy vegetables that you can grow in colder climates. Many perennials are great crops to try for cold-hardiness since cold-hardy perennials, by their very nature, will often produce longer into the year and come up earlier in the spring. Consider constructing cold frames or a passive solar greenhouse to extend your season even further, potentially making it last through the entire winter. If you have any of your favorite cold-hardy vegetables that you like to grow or have anything you’d like to comment on, please feel free to share in the comments below!

Thursday, April 19, 2018

7 Spring Gardening Tricks That Will Stop Summer Weeds


A little extra work in the spring can prevent a lot of weeding later in the year.


It’s a story most gardeners know all too well. We start off the growing season with a blank palette of natural soil in an atmosphere of spring optimism, always confident that this will be the best garden season ever. But if the arrival of summer brings with it an onslaught of weeds, even the most positive of spirits can get crushed under the weight of battling them.


The good news is that there are ways to combat weeds in spring, without using synthetic or even organic herbicides, which can make life a little more comfortable later on. Here are seven tricks to try.


Kill weeds first with clear plastic. Laying reusable clear plastic over the garden before planting any seeds is often an effective way to kill a lot of weeds at once. Sometimes, the greenhouse effect that is created by this method can generate so much heat that it destroys not only sprouted weeds but their seeds, as well, and possibly even other soil pathogens. As a nice side bonus, using clear plastic can preheat the soil in preparation for seeds or seedlings that will appreciate the residual warmth when the plastic is removed. One downside to this method is that it can be less effective in colder climates or during a cold, wet spring, and can end up creating favorable conditions for weed growth if the sun’s rays lack the intensity for searing heat. Make sure this one is right for your situation before using it.


Use fabric mulch before or during planting. I buy high-quality landscape fabric by the roll—the heavy-duty kind sold by greenhouse supply outfits—as often as I can afford it. It costs me a lot more money up front than the cheap stuff, but it works out to be cost-effective because I use it over and over. I use it between the rows in my in-ground garden every year, laying it out before or during planting in a way that defines walk spaces and prevents weeds in all but the smallest slivers of soil. I also use fabric in long-term applications as a weed barrier between and around raised beds, and around berries and fruit trees.


Less expensive fabric or recycled materials can also make a real difference in weeds. Some of my favorite repurposed items for mulching are bags from livestock grain and other animal feed. Used carpet—especially around the other edges of a garden where any possible chemical seepage is less of an issue—works well, too.


Use grass clippings, cardboard and newspaper. These are an excellent mulching option for smaller garden spaces and tight budgets. As with synthetic materials, it is essential to use this method before the weeds take hold—better still before they even sprout. I’ve used this mulching process with good results, and have found that the most important secrets to success are to do it on a day with little to no wind. Don’t skimp on materials, use heavy, wet grass clippings, and pack it down well.


Use weed-free compost. Whether purchased from a commercial compost facility or retailer, obtained directly from a farm, or made right on the homestead, the key is to ensure it’s been heated sufficiently to kill weed seeds. We get all the weeds we need from nature, and do not need to import more!


Maintain the highest possible soil quality. Weeds flourish in poor soil, but most vegetables are not as adaptable as weeds. The more favorable conditions we can give our plants, the better armed they are to grow bigger and stronger and be better equipped to hold their own in the constant fight with weeds for space. Minimal rocks, the right ratio of sand and loam, ample organic material, and proper drainage all contribute to soil health—and in turn, make a big difference in plant health.


Provide plenty of water to newly planted seeds and seedlings. As with soil quality, water helps provide intentional plants with what they need to compete against weeds.


Provide the specific nutrients for the plants that you are growing. This point goes along with general soil quality and water but adds soil composition into the mix. It’s crucial to test garden soil—most cooperative extension services or state universities can help with this—and to amend the soil as recommended. Depending upon geography and the variety of crops being grown, soil test reports might advise raising or lowering soil pH, adjusting the ratio of organic matter, or adding specific nutrients like phosphorus, magnesium or sulfur.


The fundamental way to stop summer weeds in spring is twofold: First, make life as difficult as possible for weeds by overheating them in the sun under clear plastic or suffocating them under mulch. Second, make life as easy as possible for the plants you do want to grow by giving them the best possible soil and water conditions.


What advice would you add? Share it in the section below:


Friday, April 13, 2018

Four “Spring Hardy” Crops to Grow Before It Gets Hot

So you’ve picked out your favorite heirloom tomatoes and cucumber seeds for summer gardening and are just waiting for a little warm weather to plant your garden, right? Perhaps, but there are some tasty vegetables you can grow before the summer heat arrives. With the addition of a cold frame in northern regions, you can start to enjoy fresh vegetables right now.


digging in soilHere are four hardy crops you should consider growing before it gets too hot.


Kale

Kale is one of the hardiest vegetables out there and belongs in any spring garden. If you plant a row of kale early enough, you’ll have plenty. There are lots of kale varieties, all with different flavors and colors, so be sure to plant a mixture to spice up your plate before the days grow longer and the sun gets hotter. Sautéed kale is a great side dish with poultry and meats. It adds a tasty zing to salads and can make a delicious smoothie in the blender, too. If you have a dehydrator, you can also make kale chips for a delicious, healthy snack.


Swiss Chard

Swiss chard is another leafy green that will thrive in the cold. Plant it right away, and like kale, it will produce in colder temperatures. In colder climates, a bed of mulch is all this plant needs to keep growing on chilly spring nights. If you live in a northern region, however, Swiss chard is an excellent candidate for cold frame growing. Chards are another vegetable that comes in a wide variety of sizes and colors. They are great sautéed as a side dish; blanching them first can soften the stems up a bit. Chard is also excellent in soups and is paired nicely with ham.


Turnips

If you plant them right away, you may still be able to enjoy delicious turnips this spring, well before your neighbors get their summer gardens planted. Turnips grown in cold weather will often accumulate more sugar within them and have a delightful flavor when harvested. These root vegetables are also ideal candidates for cold frames and a protective mulch bedding. They’re a great side dish when roasted in the oven with spices like ginger. Mashed turnips are great too. You can also substitute turnips for potatoes the next time you make leek soup.


Cabbage

Who doesn’t love cabbage? Lucky for gardeners, this is another “cold hardy” vegetable you can grow right now. Plant cabbage right away, and it will produce, even in the north. (cabbage can withstand late spring snows and below freezing temperatures.) Cabbage is incredibly versatile as well and can add a nice variety to an otherwise mundane early spring meal. So try planting colored varieties to add pizazz to a plate. You can also stuff cabbage leaves with your favorite meats or sauté it with herbs and spices to ratchet up the flavor.


No Time Like The Present!

Late spring snows are no excuse to stop gardening! These four crops and many others will keep on growing well until the hot weather hits. Just give them what they need to thrive, and you’ll be enjoying fresh vegetables before you know it. So, don’t wait any longer; get out there and plant your cool weather vegetables before it’s too late!

Monday, April 2, 2018

7 Common Household Items That Make For GREAT Garden Fertilizer

7 Common Household Items That Make For GREAT Garden Fertilizer

Image source: Pixabay.com


Self-sufficient gardeners avoid the use of pre-packaged fertilizers and soil from the store. While fertilizers are easy to use, off the grid living means a store isn’t always nearby, and you might not have the means to purchase the items. Chances are you have plenty of items in your house that can be used to fertilize your garden, saving you money and time. Let’s take a look!


1. Coffee grounds. Do you start the day with an overflowing cup of coffee? Those dried coffee grounds add nitrogen, potassium and magnesium to your garden, all vital nutrients for the growth of your plants. However, it is important to remember that coffee grounds can change the pH of your soil, possibly affecting plants that need a delicate balance.


2. Tea bags. If you aren’t a coffee drinker, tea bags have a very similar effect to the soil as coffee grounds. You have to remove the tea grounds from the bags and allow them to dry before application. Many gardeners notice tea grounds are particularly beneficial around tomatoes.


3. Egg shells. Your chickens can contribute to more than just breakfast. Egg shells are a fantastic calcium source. Remember, you can grind them up and mix into their feed if you notice the shells becoming soft.


After breakfast, wash out the shells and let them dry. Break the shells into smaller pieces and put them in the ground when planting tomatoes. You can also add them around the base of already planted tomatoes. Tomatoes require more calcium than other plants.


4. Fish scraps. Early Pilgrims had trouble growing crops when they arrived in North America, mostly because of nutrient-lacking soil. The Indians who came to their aid, including the famous Squanto, taught the Pilgrims a trick – burying fish with the seeds. You don’t need to plant multiple fish inside of your garden, but using the scraps can help.


If you have an aquarium, don’t dump the water down the drain. Use this water to hydrate your garden beds and potted plants. The fish waste provides vitamins to the plants without any extra steps for you! If you filet a fish, save the bones and scraps. Some gardeners like to puree them with water and milk, creating a strong fertilizing mixture. You could bury scraps as well,


5. Wood ash. Those who have a wood stove or fireplace have a free source of fertilizer, adding potassium and calcium carbonate to the soil. Remember never to use the ash if you added anything else! Ash is an easy way to increase your soil pH, so don’t use it if your soil is alkaline. Ash is also known for keeping slugs away from your plants.


6. Bananas. Do you have kids who eat bananas like candy? Your garden loves banana peels, as well! Putting them in your compost pile is a good first step. You can also put them right into your garden to give the soil a quick potassium boost. Peels degrade fairly quickly, and they don’t produce a nasty odor. A benefit of using banana peels is that they repel pests!


7. Powdered milk. Do you have powdered milk in your cabinet that is past expiration? Don’t throw it away! You can mix one part milk into four parts water. You can also use expired milk in your fridge. Milk is a fantastic source of calcium for more than just humans! It also contains proteins, vitamin B, and sugars that improve the overall health of the plant. Plants that are failing to grow to their full potential can benefit from a boost in calcium. Milk also helps with blossom end root, commonly ailing squash, tomatoes and pepper plants.


There are so many different household items that fertilize your garden. Instead of spending money at the store, raid your cabinets! Remember to put your vegetable and fruit scraps into the compost to save money and add nutrients to your garden.


What would you add to our list? Share your additions in the section below:

Monday, March 26, 2018

10 Essential Steps To Starting Seeds Indoors

10 Essential Steps To Starting Seeds Indoors

Image source: Pixabay.com


One of best reasons for starting your own seedlings indoors is the cost-savings. When young plants are in their prime at nurseries and garden centers they also have a premium price. If you’re planting an ambitious garden, it can get expensive.


Maybe the best reason is the feeling of accomplishment, especially if you do it with the kids. This will give them a good lesson in plant germination, growth and the care and feeding of vegetables once they’re planted in the garden. They also may find them to be more interesting at the dinner table if they feel like they planted them themselves.


Seamazing: The Low-Cost Way To Re-mineralize Your Soil


Here are 10 steps to get started:


1. Decide want to plant. Hardware stores, nurseries and garden centers all have stocks of seeds you can choose from, but before you buy the rack, take a look at your garden space. Or, you can get a catalog.


2. Decide where to plant. All gardens come in a certain size. Some are large, and some are small. You need to think about how much space a mature vegetable needs and plan accordingly. Plants that are too tightly cluttered together will compete with each other for water, nutrients and sunlight. High-density planting also can create an environment for fungal growth that can wipe out an entire garden in a matter of days.


3. Know your plants. Some vegetables do better in the shade — cabbage, Brussels sprouts, cauliflower, kale and broccoli. Other plants get along well when they’re planted next to each other. A classic combination for companion planting are onion sets planted between rows of tomatoes. The two plants seem to thrive next to each other; this allows you to squeeze a little more space out of your garden. Other vegetables enjoy sun and a lot of space. All varieties of squash fall into this category, especially zucchini, tomatoes and peppers.


4. Choose a pot. Or, start saving those egg cartons. But there’s a certain kind of egg carton you need to buy and save. They’re the egg cartons made from a pressed cardboard. These cartons allow water to soak up into the soil through the carton when placed into a pan of water. The styrofoam egg cartons are water proof and can’t perform the same function.


5. Learn a potting soil recipe. You can buy your own potting soil at a garden center. In fact, some are specifically designed for sprouting. You could also make you own by blending 1/3-part dirt, 1/3-part peat moss and 1/3-part sand. This will create a moist environment for the seeds, and the sand will help with drainage, so the soil doesn’t become water logged.


6. Consider a self-watering system. This is actually quite simple.  You place your egg cartons into a pan filled with about a half inch of water. You then stretch plastic wrap over the top of the egg carton and move the pan with the egg cartons to a sunny spot in your house. What you’ve essentially created is a greenhouse environment. The plastic wrap keeps the soil from drying out in the sun. But check your water level daily to make sure everything is moist.


7. Tend to the first spouts. As your vegetables sprout, you’ll want to “tent” the plastic wrap. This is easy to do with sticks stuck into the egg cartons to keep the wrap above the tender leaves. You’ll eventually remove this tent as more leaves emerge and the plants grow.


8. Harden off your sprouts. You don’t want to plant your sprouts directly into the garden. You’ll want to harden them off to acclimate them to the outdoors. This is as simple as placing the plants outdoors during the day. If you have a picnic table or other raised surface, put the plants on top to keep the pesky rabbits and rodents away. Also, keep an eye on the temperature to avoid an early morning or late evening frost. After about a week of hardening-off, you’re ready to plant in the garden. Keep an eye on your spacing so you don’t over-crowd.


9. Don’t start just anything indoors. The best plants for sprouting indoors are plants that bear fruit or vegetables on the vine or stalk. This includes tomatoes, peppers and squash in all varieties — in addition to broccoli, cauliflower, Brussels sprouts and cabbages. Herbs also take well to sprouting. Vegetables that don’t tolerate sprouting include many root vegetables. Root vegetables also tend to be fast to germinate and grow. We’ve all probably admired radishes popping up so soon in the garden. One root vegetable exception are onions. The small, grass-like sprouts are easily planted and are surprisingly resilient.


10. Get the timing right. The timing for sprouting various vegetables varies. Here’s a general cheat sheet that gives you some average dates for sprouting certain vegetables. This could vary depending on what part of the country you live in, but this chart makes for a fairly accurate average assuming a general planting date in the garden of May 15-30. However, some cruciferous vegetables in the brassica family such as cabbage, Brussels sprouts, kale, cauliflower, broccoli and others have a high tolerance for cold weather and can be transplanted earlier. When transplanting is defined by a range of dates in the chart below, that means you should evaluate your local conditions and frost forecasts.


VegetableStart IndoorsTransplant Outdoors
BasilApril 15thMay 30th
TomatoesApril 15thMay 15th to May 30th
BroccoliMarch 15thMay 1st
CauliflowerMarch 15thMay 1st
PeppersMay 1stJune 15th
ParsleyMarch 15thMay 15th
CabbageMarch 15thMay 1st
PumpkinMay 1stMay 15th to May 30th
KaleMarch 15thApril 30th
CeleryMarch 20thApril 15th
CucumberMay 1stJune 15th
OnionsMarch 30thMay 1st
LettuceMarch 30thMay 1st
MelonApril 15thJune 1st
Brussels SproutsMarch 30thMay 1st
PeasMarch 30May 15th
CornApril 15thMay 15th


Hopefully this year, you will enjoy a longer growing season thanks to something as simple as egg cartons and a little pre-planning.


What planting tips would you add? Share your advice in the section below:

Monday, February 12, 2018

How To Keep Your Compost Pile Churning … All Winter Long

How To Keep Your Compost Pile Churning … All Winter Long

Image source; Wikipedia


It can be a struggle to maintain your compost bin or pile over the winter. Whether you’re dealing with severe cold and/or heavy snow in northerly regions, excessive moisture in the Pacific Northwest, or desert conditions in the American Southwest, your compost pile may need a little extra help during the winter months. It’s worth it, though. By the time spring rolls around, you’ll be rich in black gold.


There are two basic composting methods. With any waste material, microorganisms (aerobic bacteria) naturally work on decomposition, and you can speed that process along by doing things like maintaining the correct ratio of green to brown waste and turning the pile regularly. Vermicomposting relies on worms to eat organic matter and then cast (poop) rich soil as a byproduct. If you keep your organic waste on bare ground, your pile likely hosts both vermicomposting and composting processes.


Hot Composting


As bacteria break down waste material, they generate heat. That heat is crucial for the bacteria to keep growing, multiplying, and just generally doing their job. While most people refer to this process simply as “composting,” the more technical term is “thermophilic composting” or, more informally, “hot composting.” And “hot composting” it is: compost piles can reach internal temperatures of 150℉!


Even though compost naturally generates heat, cold weather, of course, brings the temperature of the compost pile down. That affects the ability of the bacteria to do their job, particularly on the outside edges of the pile. If the temperatures dip too far — and especially if the compost isn’t tended to — microbial activity will cease completely. If you’re willing to wait for warmer spring temps for the decomposition to resume, then that’s not a big deal. But if you would prefer to keep generating compost over the winter months, there are a few ways to help your compost’s microorganisms chug along.


If You Build It


Help your compost stay toasty by enclosing it with three walls and a roof. (Leave the south-facing side uncovered, so that it can absorb warmth from the sun.) This can be as easy or as complex as you make it. Stack cinder blocks or nail together scrap lumber for the walls. For the roof, you can just balance a loose piece of lumber on top or throw a tarp over the whole thing. Even easier: Buy a compost tumbler. Enclosing compost not only helps trap its heat, but also to moderate the effects of wind and excessive moisture.


If your region experiences extreme cold, adding insulation is a good idea. Again, this does not have to be done at great cost or effort. Surround your enclosure with straw bales, line the walls with several layers of cardboard, or pile snow, straw, or leaves around it. Don’t forget to insulate the roof, as well.


Go Bigger


The bigger your compost pile is, the more bacteria it will have, and the more heat it will generate. According to the University of Illinois Extension, compost piles that are at least one cubic yard in size will weather Midwestern American winters best.


Fuel Up


Adding new waste material regularly is crucial — but you need to be careful about what kind of material you add and its size.


Maintaining the ideal proportion of green to brown waste (a.k.a. the C:N ratio) is especially important in the winter, when we want our compost piles to work at maximum efficiency. Check this site for detailed information about the C:N ratio to shoot for depending on which brown waste you add.


If you bag leaves in the fall with the intent of adding those to your compost over the winter, bring a bag inside overnight before dumping it in, so that the cold leaves don’t bring down the temperature of the pile.


It’s also a good idea to shred waste before dumping it in. Waste that’s roughly two inches in size will break down more quickly, keeping heat levels consistently high.


Not too Wet, Not too Dry


Ideally, compost should be just lightly moist. If it’s too wet, the bacteria can’t get the oxygen they need to survive. But if it’s too dry, the bacteria can’t do their job, either.


If you live in an area that experiences heavy moisture in the winter, plan your compost enclosure accordingly: a South-facing opening so that the sun can warm and dry the waste; and a roof or other covering to keep moisture out. If your compost pile unexpectedly gets too wet, stirring it up with a pitchfork should help dry things out. Additionally, adding more brown waste will help soak up excess moisture.


If you live in a desert area, keep your compost uncovered. Make a crater (or craters) in the top, to catch all the moisture you can. If worst comes to worst, you can always break out the hose.


Vermicomposting


As might be expected, vermicomposting can be problematic during cold winter months. That said, a simple workaround is to keep your vermicompost bin indoors. If the thought of a bin full of worms under your kitchen sink grosses you out (and I’ll admit I’m in that camp), the bin can be kept in an insulated garage or outbuilding, or elsewhere in your house, such as the basement or laundry room.


Depending on your location, it may be possible to keep your vermicompost box outdoors during the winter. Keep in mind that the worms will die if they get either too cold or too hot. You’ll need to experiment to find a balance of insulating the bin enough to keep it warm, but not so much that the insulation along with the heat from the hot compost process plus any heat from the sun fries your worms.


Do you keep your compost pile active all winter long? If so, share your tips and trick in the comment section below.

Monday, February 5, 2018

12 Seeds You Need To Start NOW For Spring Planting

12 Seeds You Need To Start NOW For Spring Planting

Image source: Pixabay.com


For many of us, late January is still cold and snowy, but the days are lengthening, and warmer temperatures are on the way. It’s so tempting to break out the seeds!


But planting seeds too early can backfire unless you have a setup that includes things like heated seed propagation mats, grow lights, and consistent regulated temperatures. I don’t. I do have a terrific enclosed south-facing verandah with lots of windows, but the days are still short here, without the amount of sun many seedlings need. This can make for spindly, weak plants that stretch towards the light, and that are unable to support the weight of their leaves. Also, the temperature is hardly consistent, given the blasts of cold air each time the door is opened.


That said, some seeds can be started by late January with just a little care. Often, these are seeds that germinate slowly, with their seedlings becoming established in mid-late February, when the amount of sunlight and daily temperatures have both increased.


When choosing what to plant this time of year, always check seed packages (or research the varieties you’re planting) to find out the expected number of days to maturity. Then, cross check that with the last expected frost date in your area, which you can find here. Don’t choose seeds that will mature before your last frost date — you need to move your plants outside after the last frost so that they can finish growing outside for the best results and flavor.


General Hint


The top of your refrigerator is often warm enough to replicate a heated propagation mat. If you’re sowing seeds that need heat to germinate, keep them on top of your fridge. Once sprouted, the seedlings should be moved to a window area to get as much sunlight as possible.


Strawberries


It can be tricky to grow strawberries from seeds, but it’s much more fulfilling than buying established plants at a nursery.


The earlier you start strawberry seeds, the more likely you’ll get fruit in the first year. Aim to start in January or even December. That said, strawberries are perennials. If you start late, you’ll still get plants, if not fruit, in the first year.


Strawberry seeds germinate best if they go through a stratification process. Put the whole package of seeds into an airtight plastic bag or container and toss them into the freezer for 3-4 weeks. When you take the seeds out, let them warm up to room temperature before removing them from the bag or container, so that they don’t get condensation on them as they thaw. Then, once planted, keep the cells or containers in a tray that has a thick piece of fabric placed on the bottom. Keep the fabric wet so that the soil in the containers can wick up moisture as needed, without sitting in water. Use bright fluorescent lights to supplement sunshine and keep the temperature between 65-75 °F (18-24 °C). Germination can take one to six weeks. Be patient!


Once strawberry seedlings have their third true leaf, transplant them to bigger pots. Make sure to harden them off before transplanting outside.


Onions, Leeks, and Shallots


It’s best to plant onion, leek, and shallot seeds about 10-12 weeks before the last frost date, which means sowing in January or February works well in most hardiness zones. All three need warmth to sprout; keep sown seeds on a heated propagation mat, on top of the fridge, or tucked under a plastic bag or dome. The seeds should sprout fairly quick, but the seedlings grow quite slowly. Like other plants started indoors, these should be first repotted into larger pots, before being hardened off and transplanted into the garden.


Celery and Celeriac


Celery and celeriac are relatively easy to start from seeds, but it can be a challenge to get these plants to produce in the garden, as they are averse to both cold and heat. If you’re up for the challenge, start in late January or February as the plants need about 90 days from seeding until they’re ready for transplanting. Mix the tiny seeds with sand and then sprinkle that mix on top of your potting soil. Celery is slow to germinate and grow, but it doesn’t require any help (like a heated propagation mat or wet fabric to wick moisture from). All it needs is patience.


Woody Herbs (Oregano, Rosemary, Sage, Thyme)


Herbs with woody stems are usually propagated by cuttings because they grow so slowly from seed. But that’s just what we want when we’re looking for seeds to start in January and February. Of the four herbs listed here, rosemary is the most finicky and hardest to grow from seed. It will need a heated propagation mat or fridge top and should be covered with plastic. Oregano, sage, and thyme, however, have no special requirement other than bright light. Once the seedlings are sturdy enough to handle, transplant them into larger pots. By late April or May, they should be ready to plant outdoors — just be sure to harden them off first.


Chili Peppers


In general, the hotter the pepper, the longer it takes to mature. Hot Rod peppers, for instance, only need 57 days to mature, while Habaneros take a minimum of 120 days. Keep this in mind when choosing which variety to plant now. All hot pepper plants need heat to flourish. Use a heated propagation mat, the top of your fridge, or at least keep your seeds and seedlings as toasty as possible, in a warm, draft-free location, and covered with a plastic bag or dome. You’ll need to repot them when they have several sets of leaves; they should be transplanted outdoors once overnight lows stay at 50°F (10°C) or warmer.


Eggplant


Like many of the other seeds that are suitable for early planting, eggplant seeds require warmth to germinate. The seeds are quite tiny; mix them with sand, if needed, and then sprinkle the sand mixture on your potting soil. Once planted, keep the cells or containers on top of your fridge, on a heated propagation mat, or covered with a plastic bag or cloche. It should take about one week for seeds to germinate. They’ll be ready to transplant in about four to six weeks, and ready to go into the garden 10-12 weeks after planting.


Have you started any seeds already? Do you have any tips for producing strong healthy seedlings when you sow seeds early? If so, please share in the comments below.

Monday, January 22, 2018

Easy Ways To Maximize The Harvest In Your Unheated Greenhouse

Easy Ways To Maximize The Harvest In Your Unheated Greenhouse

Image source: Pixabay.com


Read part 1 in this series here.


For those of us living in northerly regions, using an unheated greenhouse in the winter may seem far-fetched. And yet, it’s perfectly feasible. Even way up north in hardiness zone 3, a simple greenhouse covered with flimsy plastic sheeting can give you a winter harvest. Greenhouse “glazing” (be it plastic sheeting, or polycarbonate or glass panels) can help replicate the climate 1.5 zones to your south; and further coverings inside the greenhouse (such as floating row covers) can give you the leeway of another 1.5 zones. In this way, a zone 3 winter becomes a zone 6 winter. While zone 6 isn’t exactly tropical, its climate supports the growth of cold-hardy vegetables.


The key here is “cold-hardy.” An unheated greenhouse won’t do for heat- and sun-loving plants like tomatoes, peppers, or melons. But with a little thought, planning, and experimentation, you should be able to harvest salad greens, leeks, hardy root vegetables, and cool-weather Chinese greens during the winter months.


Building the Best Greenhouse


The location of your greenhouse and how it’s constructed will have a huge impact on your harvests. Before you start building, consider the following:


  • Ideally, a winter greenhouse should be situated against the south-facing wall of a house, garage, or outbuilding (such as a shed or chicken coop). That way, it will be protected from northerly winds while also benefiting from ambient heat.

  • If it’s not possible to build your greenhouse against an existing wall, its freestanding north-facing wall should be opaque (ideally painted black) so that it absorbs and retains heat.

  • Make sure the location isn’t shaded.

  • A foundation laid below the frost line will both protect against frost heave and insulate the soil within it.

  • The angle of the roof is crucial to capture the maximum amount of sunlight. Optimal roof angles differ depending on latitude. To figure out the best angle for your location, consult the Cold Climate Greenhouse Resource published by the University of Minnesota.


How Cold is Too Cold?


Depending on your hardiness zone, you may be able to get by solely with passive solar and ambient heating. In colder regions, you may need to supplement some warmth. There are a number of ways that you can generate and/or trap heat without resorting to electricity or fuel.


Especially if you are setting a foundation below the frost line anyway, a sunken greenhouse can provide the warmth plants — especially root vegetables — need. As the Cold Climate Greenhouse Resource explains, soil located 4 feet below the surface stays at a steady 40-50℉ regardless of air temperature.


Alternately, a trench or hole in the center of your greenhouse, filled with manure, will generate heat as the manure breaks down; and as a bonus, you will always have fertilizer easily at hand! Another option is to create heat sinks by filling black 55-gallon drums with water. The barrels absorb heat from the sun during the day and slowly release that heat at night. If you’re up for it, more complicated systems include solar heating and circulating water heated with solar power.


Regardless of how — or even if — you provide supplemental heat to your greenhouse, keep in mind that plants also need sunlight to thrive. During the shortest days of the year, growth will come to a standstill regardless of how warm your greenhouse is.


Choosing the Best Vegetable Varieties


As noted above, it’s essential to focus on cold-hardy vegetables for your unheated winter greenhouse. It may take some experimenting to find which varieties work best in your zone and your greenhouse’s microclimate, but to help you get started, consider these:


  • Cold-hardy salad greens, including endive, radicchio, kale, Swiss chard, spinach, arugula, collard, and mustard greens. Plant your greens in succession (perhaps one tray a week) and, when ready for harvest, cut what you need, leaving some green behind. The plants will continue to grow so that you get a second (and possibly third) harvest.


  • Root vegetables such as parsnips, beets, turnips, and carrots. As an added bonus, to deal with cold temperatures, root vegetables convert their starches to sugars, which act as a sort of natural anti-freeze. The increased sugars mean sweeter-tasting veggies.

  • Pak choi, Chinese cabbage, and other similar cool-weather Chinese greens.


Timing your Seedlings


It’s best to start your seeds in late summer or early fall so that your seedlings are well established before extreme cold hits. However, you can sow throughout the winter. If you choose to plant during the coldest months, start your seeds indoors or use a heat mat for seed propagation. Tender seedlings are more sensitive to the cold and need a solid start before they’re left 24/7 in an unheated greenhouse.


Why Bother?


You’re not alone if you’re wondering whether digging a four-foot “basement” for a greenhouse and calculating the optimal roof slant is more work than it’s worth. But, if you’re reading this, it goes without saying that you already know the benefits of gardening, whether in winter or summer: the joy of dirt under your fingernails; putting tasty, nutrient-dense produce on your table; cost-savings compared to purchasing bland supermarket vegetables; and self-sufficiency. Using an unheated greenhouse in the winter brings extra benefits, including the cost-savings over a heated greenhouse, supporting the environment, and the joy of proving those folks wrong, who think it’s impossible to grow fresh vegetables in the depths of winter.

Monday, January 1, 2018

How To Build The Best Unheated Greenhouse For Winter Use

Building The Best Unheated Greenhouse For Winter Use

Image source: UMN.edu


Watching the snow blow and hearing the wind gust during the winter months, it’s hard to imagine growing vegetables outside. Sure, a greenhouse might make it possible, but that greenhouse would have to be a sturdy structure with a reliable heat source, right?


Actually: No. Winter hardy vegetables can be grown in unheated greenhouses–even those covered with flimsy plastic sheeting–into Zone 3. I live in Zone 3. Trust me; it gets cold here. The minimum average temperature is -30 degrees to -40 degrees Fahrenheit,  and that does not include the windchill factor.


The idea of growing our own vegetables outside in those kinds of temps is pretty amazing, isn’t it? If building an unheated greenhouse for winter use piques your interest, check out this excellent in-depth guide from the University of Minnesota (UMN). Much of the information that follows can be attributed to that guide. As northern Minnesota is in hardiness zones 3a/3b, the information in the guide is widely applicable to most regions of the USA that experience freezing winter temperatures (except Alaska!).


How an Unheated Greenhouse ‘Works’


If you have an existing greenhouse, it may or may not be suitable for winter use. Typically, unheated greenhouses used in the winter are designed to capture as much sunlight and heat as possible. These structures can’t be used after late spring because they get too hot.


Get The All-Natural Fertilizer That Doubles Garden Production!


To capture that sunlight and heat, the structure needs to follow careful design and placement principles (more on that below). When positioned correctly, the structure’s outer covering moves the plants within it one and a half hardiness zones to the south. If a second layer of covering is added inside the greenhouse (such as with a floating row cover or cold frame), an additional one and a half hardiness zones are gained.  In this way, gardeners in Zone 3, for instance, can replicate the climate of Zone 6.


A double layer of covering also increases humidity levels within the greenhouse, which offers further protection against frost.


Even with all these considerations, an unheated winter greenhouse is best used to grow leafy greens and cold hardy vegetables. While the cool temperatures are an issue for more tender vegetables, the real issue is the lack of sunlight. Tomatoes, for instance, need a minimum of eight hours of full sun a day (not to mention pollinators!) in order to produce tasty fruit.


Location, Location, Location


The location of your greenhouse is crucial. It’s ideal to place the structure against the south-facing wall of your house so that it gets full sun as well as ambient heat from your home. Another option is to place it on the south-facing side of an insulated garage or shed.


But before you run out and start framing in a greenhouse against an existing building, there are a few other things to consider. A south-facing wall won’t be of much use if it’s heavily shaded by trees or nearby buildings. The UMN guide recommends walking around your property at different times of the day to gauge how much shade your prospective site gets. Particularly with hoop houses, make sure surrounding trees are in good shape and unlikely to lose limbs that would damage the structure. Additionally, since frost tends to settle in dips and hollows, don’t set your new greenhouse in one. And, finally, make sure the site you choose has good drainage, particularly if you intend to plant directly into the ground.


If you don’t have any suitable south-facing walls, another option is to use an earth berm on the north side of your structure to provide support and insulation. Freestanding greenhouses should have an opaque and insulated north-facing wall, as heat is lost rapidly through clear glazing on the north side.


Design Principles


Orientation


The UMN guidebook points out that the way a greenhouse is oriented and the angle of the roof/top glazing are key to a successful winter harvest. However, both things are often overlooked in the design stage.


The angle of the roof affects how much sunlight (and heat) permeates the structure. The UMN guidebook offers advice on how to determine the best angle for your greenhouse roof, which involves looking at the sun path chart for your latitude and at the angle of sunlight in your part of the world on the shortest days of the year.


As well, it’s crucial that the opaque back wall face due north, with the short sides of the structure aligned in an east-west direction.


Foundation


As with any foundation, the one for your greenhouse should be laid below the frost line. In Zone 3, that means going at least four feet down. Setting the foundation that deep not only protects the structure from frost heave but helps maintain warmer soil. As the UMN guidebook explains, at that depth, soil temperature stays at a steady 40-50℉ year round, regardless of temperature fluctuations in the air. The foundation will also provide insulation for the soil it surrounds.


Frame and Walls


There is no cut and dried advice regarding the best types of materials to use for your greenhouse frame and walls. There are pros and cons to metal versus wood frames, as well as to plastic sheeting versus polycarbonate versus glass glazing. Consider your budget and the intended use of your new greenhouse and consult the UMN guide to figure out your best option.


While it’s a good idea to invest the time and energy into designing the best greenhouse for your needs and location, be prepared to tweak things over time. As you make use of your greenhouse in the winter and learn what works–and what doesn’t–you’ll likely make some changes. Gardening, whether in a garden or in a greenhouse, is typically a learning process anyway, isn’t it?


Do you have an unheated greenhouse that you use in the winter? How is it working for you? Please share any tips in the comments below.

Monday, December 18, 2017

Inexpensive Ways To Help Potted Plants Survive Winter

Inexpensive Ways To Help Potted Plants Survive Winter

Image source: Pixabay.com


Raise your hand if you’ve ever scored a massive deal at your local nursery at the end of the gardening season. Keep your hand up if those massive deals were on half-dead plants in plastic containers.


I did that once. I couldn’t resist all those dirt-cheap perennials that would keep me in strawberry rhubarb pies until my dotage. But I should have known better. I’m always in overwhelm mode in late summer and fall, trying to keep up with the plants that still need tending as well as with harvesting and preserving produce and getting ready for winter. Taking on another task, like figuring out where to plant perennials and actually getting them into the ground, was not a smart idea. And so, confession time: I didn’t plant any of them. They just sat there in their flimsy plastic pots all winter. In the spring, the peonies somehow, miraculously, sent out shoots and I got those into the ground. The rest looked beyond hope and I tossed them into the compost pile.


I’ve since learned that there are ways to overwinter plants in pots regardless of whether they’re geriatric escapees from the nursery or potted plants that you’ve had in your garden all season long.


Why Not Just Overwinter in Pots?


There are several reasons why plants have a hard time surviving the winter in containers–and most are related to the plant’s roots.


First, roots are typically hardy to two zones warmer than the plant. If, for instance, your plant is hardy to Zone 4, the roots are only hardy to Zone 6. Roots don’t have to be as tough because they’re protected by the soil. However, the small amount of soil in a pot doesn’t provide enough insulation to adequately protect roots.


Second, pots are more susceptible to freeze/thaw cycles because that small amount of soil can warm up very quickly. If you live in a colder zone, plant roots will freeze regardless of whether the plant is in the ground or in a pot. If the roots are hardy to your zone, frozen roots are part of the plant’s life cycle and nothing to worry about. However, while roots might freeze, they don’t go dormant. When the ground warms up enough, tender new roots will grow. But those young roots don’t have the ability to withstand colder temperatures; they will die when it gets cold again. This process of producing new roots that die off shortly afterward can seriously weaken the plant. It’s actually better for roots to remain consistently frozen (or at least consistently cold) all winter long.


Third, if your containers are left on a flat surface the frost, ice, and snow that accumulates on the pot’s soil can lead to root rot. As temperatures fluctuate, that frozen moisture thaws and saturates the pot. Once the temperatures dip again, the wet soil freezes. And the next time a thaw cycle hits, more ice and snow thaws and is added to the pot’s already saturated soil.


There’s no doubt that potted plants have it tough in the winter. But as the story of my peonies shows, they can pull through extended cold spells. Still, rather than just cross your fingers and hope for the best, there are things you can do to help your potted plants make through the winter.


Bring Them Inside


This seems like the most obvious suggestion, but you need to be careful about where exactly you move your plants to. Since most perennials require a period of dormancy, you can’t move them into a warm sunny window and treat them like houseplants (the exception here are geraniums). An unheated garage or shed is ideal, but a cool basement can also work. If you overwinter your perennials this way, you’ll need to water them whenever the soil gets completely dry.


Use a Sheltered Outdoor Spot


If you don’t have a suitable indoor spot, or if you have too many pots to find space for, another option is to move them to a sheltered outdoor location and cover them with mulch.


The best spot is on the north side of your house, garage, or shed. Lining up pots along a house (or heated garage) wall will provide them with some consistent warmth, while also blocking the sun on warmer days to minimize freeze/thaw cycles.


For extra protection, bury the pots in mulch–and at this time of year, it’s easy enough to find leaves for that job.


Wrap Them Up


While gardeners may wrap above-ground growth–like shrubs, hydrangeas, and rosebushes–in burlap over the winter, potted plants have a different issue. As explained earlier, it’s usually not the plant growth that needs protecting in a pot–it’s the roots. You can insulate and protect your roots by wrapping the pots in bubble wrap, burlap, or old sheets.


Bury Them, Pot and All


This is the most labor-intensive option, but it gives your plants the best chance of survival. And while it still involves some sort of planting, it doesn’t have to be as strategic as choosing a permanent place for the plant.


Depending on the number of plants you have, dig a hole or a trench in your garden or compost pile. The depth of the hole depends on how large your pots are. Ideally, the pots should be laid–or at least tilted–on their sides to prevent thawed moisture from accumulating on top. Once placed in the trench, the pots should be covered with mulch, or lightly covered up with soil. If you don’t have the space–or the time–to dig a big enough trench and need to leave the pots upright, bury only two-thirds of the container to improve drainage.


Potted plants do need a little bit of extra help to make it through the winter, but they’ll reward those efforts in the spring. What are your tried and true tricks for overwintering potted plants? Tell us in the comments below.


What advice would you add? Share it in the section below: