Showing posts with label winter survival. Show all posts

Thursday, February 16, 2017

It’s 1,000 Years Old. It’s Edible. And It’s On Your Property

It’s 1,000 Years Old. It’s Edible. And It’s On Your Property

Image source: Steve Nubie


We usually ignore them and don’t even notice them, but they’re one of the most primitive lifeforms on Earth. They’re also good eatin’.


They are lichens, a form of algae with a fungus membrane to support the plant. But they don’t grow in water; they grow on trees and rocks and sometimes on the ground.


Some of the lichens you see in the wild could be hundreds if not thousands of years old.  That’s why you shouldn’t pick or scrape lichens arbitrarily. In a survival situation, all bets are off, but if you’re not going to eat it, respect it and leave it alone.


Most lichens are benign, a few are toxic and only a couple have been identified as poisonous. This is not as severe as the mushroom world, where there are numerous varieties that are downright deadly, but you gotta know your lichens.


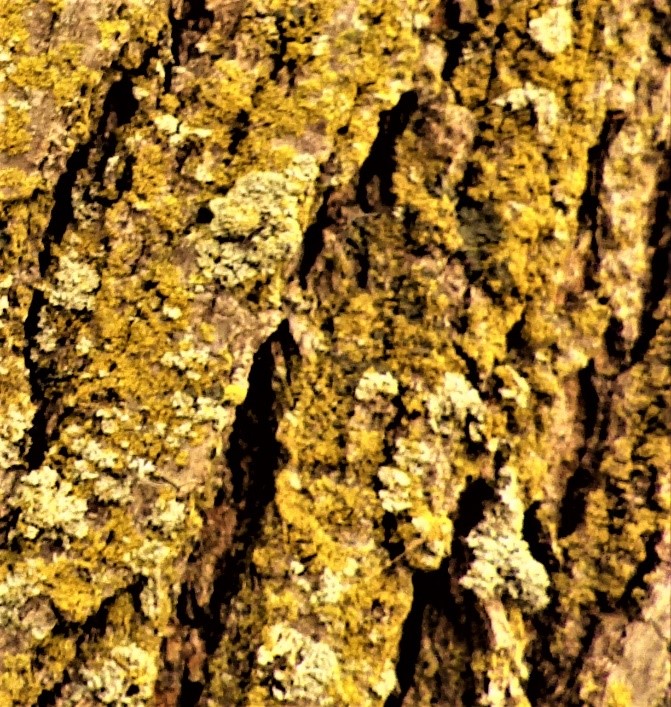
In fact, only two forms of lichen out of 20,000 varieties are defined as poisonous. One is called Vulpacida pinastri and the other is called Letharia vulpina. Their common names are the powdered sunshine lichen and the wolf lichen.

It’s 1,000 Years Old. It’s Edible. And It’s On Your Property

Image source: Steve Nubie


Both are colored yellow and as a general rule you should avoid lichens that are yellow or orange. The wolf lichen is greenish yellow and the powdered sunshine lichen is sulfur yellow. It’s the blue and green varieties that are typically safe to eat.


Lichens 101


Before you dismiss lichens as some caveman survival food, you should know that Chef René Redzepi of the Noma restaurant in Copenhagen has touted lichens as a critical part of his cuisine. He has been identified as the top chef in the world by numerous publications and culinary organizations, and he uses lichens regularly in many of his dishes.


But you might not agree if you simply start chewing one you’ve just picked off a tree.


Get The Essential Secrets Of The Most Savvy Survivalists In The World!


According to the U.S Forest Service, here’s the dictionary definition of a lichen:


Lichens are dual organisms consisting of a fungus and an alga or a cyanobacterium. The fungus provides the alga with structure, protection, nutrients, and water absorbed from the atmosphere and the substrate (e.g., soil, rotten logs, tree branches). In return, the alga provides carbohydrates from photosynthesis to the fungus. Algae from some lichens grow independently of the fungus, but in lichen form, the algae can inhabit more challenging environments than when growing alone.


There are three types of lichens based on these photos from the U.S. Forest Service:


It’s 1,000 Years Old. It’s Edible. And It’s On Your Property

Foliose (leaf-like)


It’s 1,000 Years Old. It’s Edible. And It’s On Your Property

Fruticose (shrub-like)


It’s 1,000 Years Old. It’s Edible. And It’s On Your Property

Crustose (growing closely attached to a surface)


Wherever you live in the world you’ll probably encounter one of these types, if not all three. Northern latitudes tend to see more prolific lichen growth. That’s good news in a winter survival situation.


How Do Lichens Taste?


A raw lichen right off the tree or a rock is going to have the consistency of a rubber inner tube and taste highly acidic if not downright astringent. You have to soak them in water for hours, with frequent water changes. This will get rid of the natural acids that permeate the lichen.


A Japanese technique is to gently boil them with frequent water changes. This will result in a lichen that is quite gelatinous. In case you’re wondering, “gelatinous” means slimy, similar to the slime you see when you boil okra or cactus. It’s OK to eat it, but be prepared.


In a pure survival situation, you would soak the lichens in water with frequent water changes and eat them like potato chips. They’re going to be tough blue or green potato chips, but they’ll help to keep you alive.


In a more civilized environment, you can slice them and toss them in a pasta with olive oil, or add them to a soup or broth to thicken the soup. Even in a simple cup of chicken broth, lichens will add viscosity and body, making it sip more like a gravy than a watery broth.


In Scandinavia, lichens are often added to flour for bread-making after they have been soaked in multiple water changes and the acid has been leached out.


A modern technique is to add bicarbonate of soda in a proportion of one teaspoon to a quart of water. This will also help neutralize the acids.


In Africa, lichens were used for jelly-making with locally harvested fruits. It has the same qualities as gelatin and was also used by American pioneers prior to commercially made gelatin becoming available.


Regardless of the technique you chose to use, I would strongly recommend soaking the lichens in a bowl of vinegar for at least 30 minutes before you soak them in the water changes. Vinegar is a powerful antiseptic and will kill any germs on the lichen’s surface. That’s important because these organisms have potentially been exposed to elements for thousands of years. That gives them plenty of time to pick up some nasty microbes.


In a survival situation, you may only have water or at least boiling water to sanitize any lichen. In this instance, I would prefer lichens growing on a tree and preferably under a large, over-hanging branch. No guarantees but it may have had less exposure to the elements in this kind of environment as opposed to lichens growing on rocks.


Nutritional Value


The nutritional value varies, depending on the species and the amount. Generally, lichens have some of the nutritional benefits of a well-known form of algae called “spirulina.” It has vitamins like vitamin K and vitamin C, some carbohydrates and a fairly good calorie count based on the size.


Harvesting Lichens


Older, more mature trees tend to provide the most lichens. This is because it takes them so long to grow. Rocks and cliff faces also will provide lichens. On a canoe trip in Canada I remember seeing a large slab of granite on the shoreline covered in lichens like a patchwork quilt. Just make sure you stay away from the yellow and orange ones.


The best tool for lichen collecting is a knife. You have to cut it away from the rocks or trees. They come off simply, but most tree lichens will have some tree bark attached.  The external tree bark of any tree is indigestible, so try to shave it away. I’ve sometimes used my thumbnail to do this.


However, winter presents some unique problems. The lichens are typically frozen. You may want to grab more bark from a tree and deal with it after you’ve soaked it. The same is true for rock lichens.


To preserve lichens for future use, sanitize them in vinegar for 30 minutes, do numerous soaks in water changes for a few hours, and then dry them in a food dehydrator. When it’s time to eat, rehydrate them in cold or gently boiling water.


Lichen Recipes


There are two lichen recipes that I make from time to time:


Lichen Ramen Soup


It’s 1,000 Years Old. It’s Edible. And It’s On Your PropertyIngredients


  • 1 package of Ramen noodles plus broth seasoning

  • 2 cups of water

  • 1 cup of lichens soaked in water changes and cut into julienne strips

  • 1 teaspoon of soy sauce

Directions


Soak the lichens in vinegar for 30 minutes and then put them through continuous water soaks for about 4 hours, changing the water every hour. Add the two cups of water to a saucepan and then add the Ramen soup flavoring packet. While you’re waiting for the water to come to a boil, slice the lichens into thin strips. Add the noodles to the water when it’s boiling and then add the lichen strips. When done, spoon and serve into bowls.


Lichen Pasta


Ingredients


  • 1 quart of water

  • 1 tablespoon of salt

  • 12 ounces of pasta (any variety)

  • 3 tablespoons of olive oil

  • ½ cup of parmesan cheese

  • 1 cup of thin sliced or julienned lichens

  • 1 tablespoon of parsley

Directions


Prepare the lichen as indicated previously in rinses of vinegar followed by rinses of water. Add water and salt to the pot and bring to a boil. Then slice the lichens and set aside. Add the pasta to the boiling water and cook until done. Drain the pasta and toss with the olive oil, parmesan cheese, lichens and top with parsley. Serve.


Have you ever eaten lichen? What advice would you add? Share it in the section below:


Learn How To ‘Live Off The Land’ With Just Your Gun. Read More Here.

Thursday, February 9, 2017

7 Instant And Natural Winter Survival Shelters

7 Instant And Natural Winter Survival Shelters

Image source: Pixabay.com


I’ve been in survival situations numerous times — usually because of bad luck or sheer stupidity. The two worst ones occurred in winter, and, thankfully, I survived.


Winter is unforgiving in a survival situation. The only advantage is that the snow and ice are delivering you a regular water source that’s typically safe to drink when melted.  After that, everything else is worse.


The critical first step is staying warm, building a fire and sustaining it. But there’s a second priority that’s equally important: shelter.


But before you exhaust yourself scrambling to find the branches, boughs and other materials to build a shelter, take the time to look for a natural shelter.


1. Low-growing pines


You may have seen a pine tree with its boughs overloaded with snow. It’s not an inviting sight, but if you spread the boughs and look at the base of the tree you may be surprised to see dry ground around the trunk. This is one of the ways that nature can provide you with an instant shelter that will protect you from the wind and snow.


7 Instant And Natural Winter Survival Shelters

Image source: Pixabay.com


If you cut away a few low-hanging branches you can build a fire that will provide some heat. You also could build the Swedish “upside-down fire” even if you can’t clear all of the snow off the ground. We’ll cover that at the end of this article.


2. Large deadfalls


A large tree, whether it be a pine or deciduous, will often create a natural canopy over an area of ground if it has been toppled. Here again, you’re looking for that precious bare ground that says it may stay that way over a period of time. You could carefully clear some branches for a fire to provide some heat, but you’ll need to guard against snow melt.


3. Root cavity of large uprooted trees


We have a cabin in Michigan. One summer, a violent windstorm uprooted a monster oak not far from the cabin. It was a green tree, so I was going to wait until the next summer to cut it up. During the winter, I was walking and noticed the snow-covered and sand-encased roots forming a natural canopy over the hole left by the roots. It was dry and no snow had entered. I climbed down and was surprised that the sand was still soft and unfrozen. It was cozy but a bit claustrophobic. In an emergency, I would have gotten over that fairly quickly.  It was my first experience in a literal root cellar.


Learn The Secrets and Tricks Of The Word’s Top Survivalists!


Large uprooted trees are fairly common in heritage forests, so keep a look out and you might find your own natural root cellar as a winter shelter.


4. Caves


If you’re fortunate enough to find a cave, you’ve found nature’s natural penthouse.  However, advance cautiously. You’re not the only animal in the woods trying to survive the winter, and some of the other animals have bigger teeth.


Caves are also ideal for capturing the heat of a fire. Build the fire as large as you want.


5. Rock canyons


7 Instant And Natural Winter Survival Shelters

Image source: Pixabay.com


In some parts of North America there are natural rock canyons. They’re often narrow in parts and both the snow and wind have a hard time getting into them. That’s a good thing.  Here again, you can haul in your firewood and build a significant fire to stay warm. If you’re worried about animals using your canyon as a pathway at night, build fires on either side of you in the canyon. Just make sure they’re small enough so that you can jump over them.


6. Rock overhangs


There are occasions along a cliff face that a natural depression will occur, resulting in an overhang. It’s not as cozy as a cave, but it could protect you from precipitation and the wind, depending on the wind direction. It’s also a good environment to enjoy the heat of a fire; the rock at your back and around you should reflect the heat nicely. You just have to hope the wind doesn’t shift and fill your little enclosure with snow drifts.


7. Large boulders


It’s a bit odd to be walking through the woods and encounter a large boulder in the middle of nowhere. It’s so odd that geologists call them “erratics.” They’re erratic because they don’t geologically belong there. They were delivered by the glaciers as they advanced south during the Ice Age.


An erratic has some benefits. For one, the leeward side (the side opposite the wind) will often have less snow on the ground and will protect you from the prevailing wind. It also can serve as an excellent heat reflector. You can sit with your back against the wall of the boulder, and the fire will heat you and the rock face. Or you can build the fire at the base of the boulder to allow the rock to act as a huge reflector. This assumes you have a clear night without precipitation.


Do you know of other instant and natural winter survival shelters? Share your tips in the section below:


Learn How To ‘Live Off The Land’ With Just Your Gun. Read More Here.


Thursday, January 19, 2017

4 Winter Skills Every Homesteader Should Know

4 Winter Skills Every Homesteader Should Know

Image source: Pixabay


Chances are that if you’re reading this, then you’re probably acutely aware of just how tough it can be to handle the year’s coldest months on the homestead.


It’s not long after the winter solstice that the temps begin to plummet, creating a perfect storm for situations on the homestead to deteriorate. After all, February’s full moon is known as the “Trapper’s Moon” — named for the fact that, like the snow, beaver pelts are at their thickest. Beavers have had to adapt this capability, perhaps with the knowledge that this is essential for maximizing their survival in extremely low temps.


Of course, if there ever were a perfect animal to model our own homesteading practices after, then it would have to be nature’s greatest homesteader: the beaver. And here are four great ways to do just that.


1. Please, remember: timing is everything


When it comes to surviving a winter on the homestead, one of the most important challenges to overcome is to see beyond the obvious ones — especially since the cold is something we’re all quite familiar with. If anything, this skill is one that keeps us one step ahead of the challenges.


Learn How To Make Powerful Herbal Medicines, Right in Your Kitchen!


Timing is everything, especially due to how the daylight drains away quickly. Not only that, but because colder temps often give way to rapid-moving high-pressure zones, the weather can change even faster. For this reason, it’s critical to keep tabs on the following:


  • Make sure you are able to read the clouds to detect potential changes in weather, so you’re not caught completely off-guard if you must prepare for a fast-approaching blizzard. For more information, check out our recent article, Survival 101: How to Forecast Tomorrow’s Weather Without the Weather Channel

  • Since winter brings low-light conditions early in the day, it’s important to provide lighting in as many places around the homestead as possible. Predators aren’t fond of them, and they simply keep us safer from injury and disorientation.

  • Additionally, I recommend an EDC (everyday carry) kit that rides along with you. This will buy you additional time if you find yourself in a winter survival scenario and possibly require rescue.

3. Dress (and sew) for success


You’re probably not surprised about just how critical warm clothing can be this time of year. However, it’s important to know how to fix that clothing in a pinch. Knowing how to sew, along with having a kit that can meet the task at hand, could be invaluable.


4 Winter Skills Every Homesteader Should Know

Image source: Pixabay


It’s not uncommon for homesteaders to find themselves snowed in, largely cut off from access to populated areas, meaning that your best work coat is only as warm as the quality of its patches. With that being said, it’s important to invest in clothing and winter apparel that maintains insulating properties even while moderately moist or damp, such as wool and certain synthetics. Cotton, however, will lose all insulating properties when wet, so it’s best to stick with the tried-and-true materials (and not end up with frostbite).


2. Stay healthy


The cold is downright brutal on the body, especially for immune systems, since our metabolism must work harder to maintain body temps. So, it’s smart to keep your medicine cabinet well-stocked with the usual sick-fixes and your mind well-stocked with at least basic medicinal skills. Not to mention, the cold also can make for far-more-difficult muscle movements, impairing motor skills in the process.


So be sure to keep your walkways — along with those of your livestock — clear of ice and snow. Broken bones and torn tendons tend to make life A LOT more difficult for everybody.


1. Be efficient with your heat


Heat is, perhaps, the most coveted commodity on the winter homestead — meaning that you need to be able to generate it cheaply and hold on to as much of it as possible. Becoming knowledgeable about heat efficiency would greatly reduce your burden to chop wood and shovel pellets. For this, I’d recommend purchasing an IR camera to identify problem spots where heat may be leaking out your cabin. At least then you’ll be able to pinpoint exactly where to apply a can of insulating/expanding foam in the most scientifically efficient way.


In a previous post we discussed how to build your own water heater, running on nothing but the heat generated by your homestead’s compost pile. Not only can this system achieve higher temps than most residential water heaters, but you’re also using zero electricity in order to keep it working. Get good at thinking up designs and innovating your infrastructure on heat conservation, and you’ll spend far less time and energy trying to keep everybody (including your water supply) toasty warm.


What advice would you add? Share your tips in the section below:


hydrogen peroxide report

Thursday, January 5, 2017

Dave Canterbury’s Winter Survival Hacks

The Amazing History Behind Your Favorite Christmas Songs


Survival in the wilderness is never easy, but survival in the wilderness when it’s frigid cold and snowing? That’s even harder. But if you’re prepared and know what you’re doing, you can live to tell about it.


On this week’s edition of Off The Grid Radio we discuss winter survival with Dave Canterbury, a survival expert and the author of several books, including The New York Times bestseller “Bushcraft 101.” Dave also teaches classes on survival and has a prominent YouTube survival channel.


< a href=”http://secure.ultracart.com/cgi-bin/UCEditor?merchantId=BH24&ADD=OTGREP348″>


Dave begins by giving us tips on everyday carry (EDC) during winter, and he then tells us:


  • How to start a fire during winter, even if it’s damp.

  • Why Vaseline-soaked cotton balls, popular in the survival community, may not be the best option.

  • Where you can find objects in the woods to burn – even if it’s been raining.

  • How a simple road flare can provide multiple survival uses.

  • Why he urges many people not to eat during survival situations.

  • How to “drink snow” without catching hypothermia.

  • Which lightweight items he carries that can provide immediate shelter.

Dave also tells us the items he believes everyone should carry in their automobile during winter. Finally, he shares with us stories from his past when he – get this – captured reptiles for a living.


If you live in frigid temps and want to be better prepared, then this week’s show is for you!